
nevadanstig
Well-known member
[TABLE="head]{colsp=2}
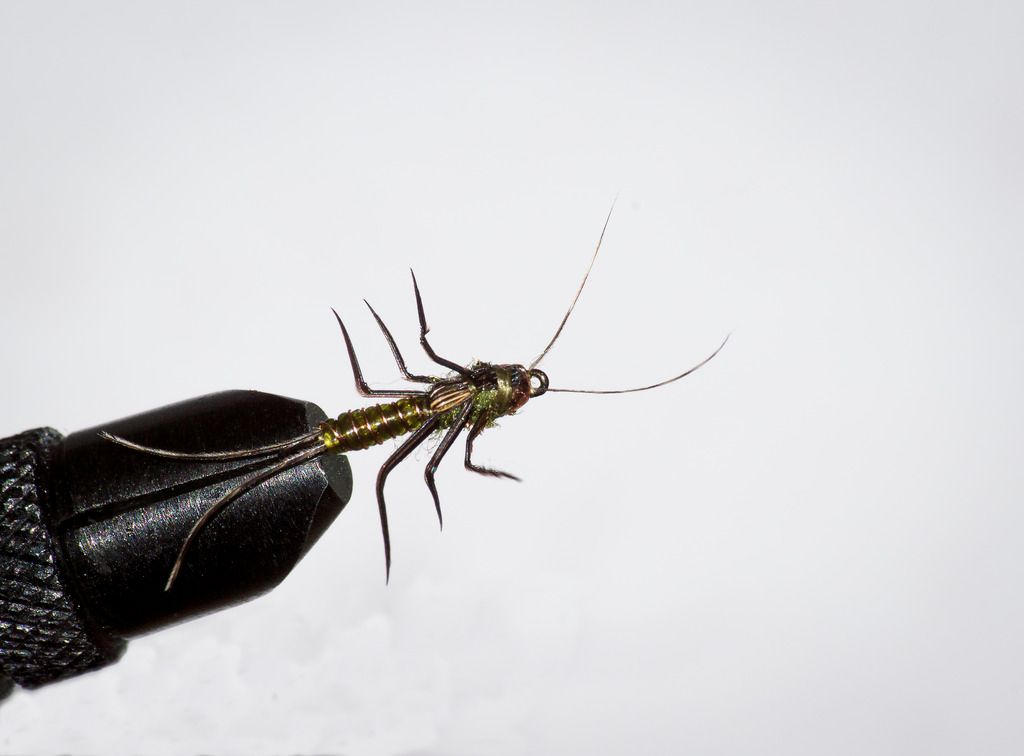
Minny Skinny Stonefly |
Type of pattern | wet fly, bead head, nymph, stonefly
Originator of pattern | Jason Lighthall (aka nevadanstig)
Tied and Submitted by | Jason Lighthall (aka nevadanstig)
Level of tying experience needed to tie this pattern | Medium to advanced. Bending the biots is the trickiest part, but they can also be left straight and the fly will still be productive
Materials list |
Hook | Size 14, 2XL nymph hook
Bead | Brass, 2.4mm
Thread | Olive
Tail | 2X Individual pheasant tail fibers
Rib | Olive, with fine copper wire
Dubbed Body | Antron Olive sparkle, over .015 lead wire
Wing Case | 4-5 pheasant tail fibers
Legs | 6X brown goose biots
Antennae | 2X Individual pheasant tail fibers
Head | Bead
Special tying notes | A lit candle will make life easier on a few steps of this tie. Light one on your table before starting if available.
Target species | Anything that would eat a stonefly.
Fishing notes | The trout out here go nuts for these.
Step 1 | After placing the bead on the hook and securing it in your vice, you will want to slide the bead BACK on the hook BEFORE starting your thread. With the bead out of the way, start your thread at the eye of the hook, run it half way down the shank, then back to the eye. Tie in an individual pheasant tail fiber on each side of the hook, forming the antennae. Whip finish, cut off your thread, then slide the bead over the thread to the hook eye.
Step 2 | Start your thread just behind the bead, then run it all the way to the hook bend. Starting at somewhere between 1/2 to 2/3 back up the hook, start wrapping .015 lead wire. Stop the wire just short of the bead, leaving a small gap. Run your thread back up and tie in the lead wire, and form a small ramp at the back of the wire. Squeeze the lead wire on each side of the fly with needle nose pliers. This will make it taller and skinnier.
Step 3 | Tie in a length of fine copper wire onto the bottom of the hook, starting at the thread ramp, and run your thread over it all the way to the bend.
Step 4 | Tie in individual pheasant tail fibers on each side of the hook at the bend (similar to the antennae at the head) to form the tail of the fly.
Step 5 | Here's the first step you need the candle. Take a length of vinyl ribbing, and hold one end of it over the candles flame until it begins to melt. Quickly remove it from the flame, and pull out the melted end with your fingers. This will stretch it out and make it very thin, allowing you to easily tie it in without adding much bulk to the fly.
Step 6 | Tie in the ribbing at the tail, and wrap it tightly up the shank, leaving no gaps, until the start of the lead wire. Tie it off there and cut off access.
Step 7 | Wind up the fine copper wire over the ribbing, in between each wrap of the ribbing, until it meets the end. Secure with thread and helicopter it off.
Step 8 | Tie in a brown goose biot to each side of the hook right where your ribbing meets the lead wire, forming the rear legs. Each goose biot has a convex and concave side to it. It is very important to have the CONCAVE side of the biots facing AWAY from the body. This is normally the way the biots have a natural curve to them, but not always, so make sure before you tie them in. Trim off excess.
Step 9 | After tying in the rear legs, run your thread up to just behind the bead. Tie in 4-5 pheasant tail fibers, which will form the wing case. Run your thread over the fibers all the way to the back legs.
Step 10 | Twist in a SMALL pinch of the olive dubbing on to your thread. You don't need much, as you'll only be making three or so wraps with it. Also, twist it on pretty tightly to the thread. Wrap the dubbing up to roughly half to 2/3 up the lead wire body section.
Step 11 | Tie in a goose biot to each side of the fly again, forming the middle legs. Again, CONCAVE OUT. Trim excess.
Step 12 | Twist on another small pinch of dubbing tightly to the thread. Again, not much is needed, just enough to get you to directly behind the bead. Wrap the dubbing to the bead.
Step 13 | Again, a goose biot on each side of the fly, forming the front legs. CONCAVE out!!! Trim excess. Pull the 4-5 pheasant tail fibers over the top of the body, and tie those in behind the bead, forming the wing case. Trim excess.
Step 14 | Whip finish just behind the bead. Notice the small gap I said to leave between the lead wire and bead on step 2 allows you to tie in the front legs, wing case, and whip finish without adding bulk. From here, if you're not comfortable bending the biots, you can finish the fly with some head cement and be done. But keep going to make the fly look more realistic.
Step 15 | Time to bend the biots! If you have never done this before, I HIGHLY recommend you practice by just placing some biots in your vice first. It is VERY easy to over heat the biots, in which case they immediately break and fall off. To bend the biots, I like to heat up the tip of my bodkin over the flame of the candle. It does not take long, maybe around 4 seconds. Once heated, place the tip of the hot bodkin on the outside of the leg where you want the joint to be. Be very careful, and remember its better to have the bodkin too cold rather than too hot. The biots will always bend over themselves on the concave side, which is why that has to be on the outside of the fly. Repeat for all six legs. I like to try to have the front legs bent the most, nearly facing directly forward, with each following leg working back bent slightly less than the one in front.
Step 16 | After bending the biots, apply a drop of head cement right inside of each joint in the legs. This will make the bent biots much more durable. Finish off the head with some cement as well.
Step 17 | Completely not needed, but I also like to add a bit of curl to the antennae and tail fibers of the fly. To do this I use the small paddle like thing on the bottom of my whip finish tool. If you've ever used scissors to curl a ribbon for a birthday present, same exact concept. I am sure they don't hold this shape in the water, but it does help them to look nice in your box.
[/TABLE]
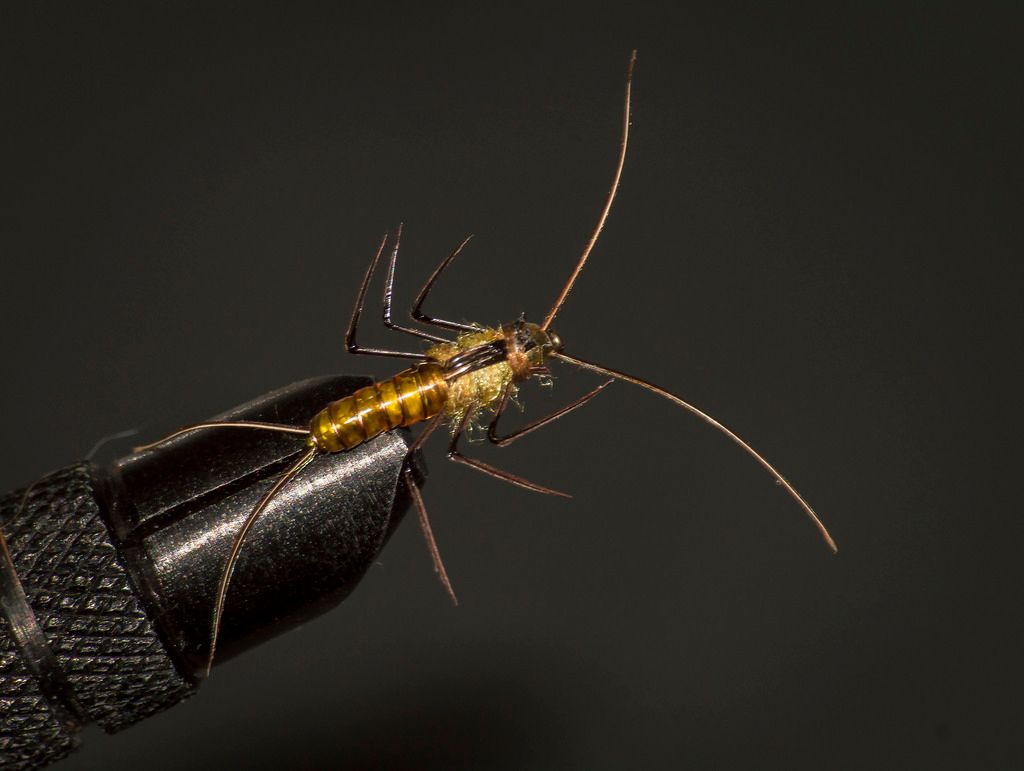
Feel free to substitute in your own colors to match what you have in your local waters. I also tie these in a gold pattern:
Enjoy the tie, and I hope this pattern brings you some enjoyment out on the water! :frogdance
Minny Skinny Stonefly |
Type of pattern | wet fly, bead head, nymph, stonefly
Originator of pattern | Jason Lighthall (aka nevadanstig)
Tied and Submitted by | Jason Lighthall (aka nevadanstig)
Level of tying experience needed to tie this pattern | Medium to advanced. Bending the biots is the trickiest part, but they can also be left straight and the fly will still be productive
Materials list |
Hook | Size 14, 2XL nymph hook
Bead | Brass, 2.4mm
Thread | Olive
Tail | 2X Individual pheasant tail fibers
Rib | Olive, with fine copper wire
Dubbed Body | Antron Olive sparkle, over .015 lead wire
Wing Case | 4-5 pheasant tail fibers
Legs | 6X brown goose biots
Antennae | 2X Individual pheasant tail fibers
Head | Bead
Special tying notes | A lit candle will make life easier on a few steps of this tie. Light one on your table before starting if available.
Target species | Anything that would eat a stonefly.
Fishing notes | The trout out here go nuts for these.
Step 1 | After placing the bead on the hook and securing it in your vice, you will want to slide the bead BACK on the hook BEFORE starting your thread. With the bead out of the way, start your thread at the eye of the hook, run it half way down the shank, then back to the eye. Tie in an individual pheasant tail fiber on each side of the hook, forming the antennae. Whip finish, cut off your thread, then slide the bead over the thread to the hook eye.
Step 2 | Start your thread just behind the bead, then run it all the way to the hook bend. Starting at somewhere between 1/2 to 2/3 back up the hook, start wrapping .015 lead wire. Stop the wire just short of the bead, leaving a small gap. Run your thread back up and tie in the lead wire, and form a small ramp at the back of the wire. Squeeze the lead wire on each side of the fly with needle nose pliers. This will make it taller and skinnier.
Step 3 | Tie in a length of fine copper wire onto the bottom of the hook, starting at the thread ramp, and run your thread over it all the way to the bend.
Step 4 | Tie in individual pheasant tail fibers on each side of the hook at the bend (similar to the antennae at the head) to form the tail of the fly.
Step 5 | Here's the first step you need the candle. Take a length of vinyl ribbing, and hold one end of it over the candles flame until it begins to melt. Quickly remove it from the flame, and pull out the melted end with your fingers. This will stretch it out and make it very thin, allowing you to easily tie it in without adding much bulk to the fly.
Step 6 | Tie in the ribbing at the tail, and wrap it tightly up the shank, leaving no gaps, until the start of the lead wire. Tie it off there and cut off access.
Step 7 | Wind up the fine copper wire over the ribbing, in between each wrap of the ribbing, until it meets the end. Secure with thread and helicopter it off.
Step 8 | Tie in a brown goose biot to each side of the hook right where your ribbing meets the lead wire, forming the rear legs. Each goose biot has a convex and concave side to it. It is very important to have the CONCAVE side of the biots facing AWAY from the body. This is normally the way the biots have a natural curve to them, but not always, so make sure before you tie them in. Trim off excess.
Step 9 | After tying in the rear legs, run your thread up to just behind the bead. Tie in 4-5 pheasant tail fibers, which will form the wing case. Run your thread over the fibers all the way to the back legs.
Step 10 | Twist in a SMALL pinch of the olive dubbing on to your thread. You don't need much, as you'll only be making three or so wraps with it. Also, twist it on pretty tightly to the thread. Wrap the dubbing up to roughly half to 2/3 up the lead wire body section.
Step 11 | Tie in a goose biot to each side of the fly again, forming the middle legs. Again, CONCAVE OUT. Trim excess.
Step 12 | Twist on another small pinch of dubbing tightly to the thread. Again, not much is needed, just enough to get you to directly behind the bead. Wrap the dubbing to the bead.
Step 13 | Again, a goose biot on each side of the fly, forming the front legs. CONCAVE out!!! Trim excess. Pull the 4-5 pheasant tail fibers over the top of the body, and tie those in behind the bead, forming the wing case. Trim excess.
Step 14 | Whip finish just behind the bead. Notice the small gap I said to leave between the lead wire and bead on step 2 allows you to tie in the front legs, wing case, and whip finish without adding bulk. From here, if you're not comfortable bending the biots, you can finish the fly with some head cement and be done. But keep going to make the fly look more realistic.
Step 15 | Time to bend the biots! If you have never done this before, I HIGHLY recommend you practice by just placing some biots in your vice first. It is VERY easy to over heat the biots, in which case they immediately break and fall off. To bend the biots, I like to heat up the tip of my bodkin over the flame of the candle. It does not take long, maybe around 4 seconds. Once heated, place the tip of the hot bodkin on the outside of the leg where you want the joint to be. Be very careful, and remember its better to have the bodkin too cold rather than too hot. The biots will always bend over themselves on the concave side, which is why that has to be on the outside of the fly. Repeat for all six legs. I like to try to have the front legs bent the most, nearly facing directly forward, with each following leg working back bent slightly less than the one in front.
Step 16 | After bending the biots, apply a drop of head cement right inside of each joint in the legs. This will make the bent biots much more durable. Finish off the head with some cement as well.
Step 17 | Completely not needed, but I also like to add a bit of curl to the antennae and tail fibers of the fly. To do this I use the small paddle like thing on the bottom of my whip finish tool. If you've ever used scissors to curl a ribbon for a birthday present, same exact concept. I am sure they don't hold this shape in the water, but it does help them to look nice in your box.
[/TABLE]
Feel free to substitute in your own colors to match what you have in your local waters. I also tie these in a gold pattern:
Enjoy the tie, and I hope this pattern brings you some enjoyment out on the water! :frogdance
Last edited:
")