
Pocono
Moderator
Salmon Fly Tutorials - The Black Ranger Pattern - Part 2
Black Ranger - Step-by-Step - The Wing
As described by T. Pryce-Tannatt is his book: How to Dress Salmon Flies: A Handbook for Amateurs.
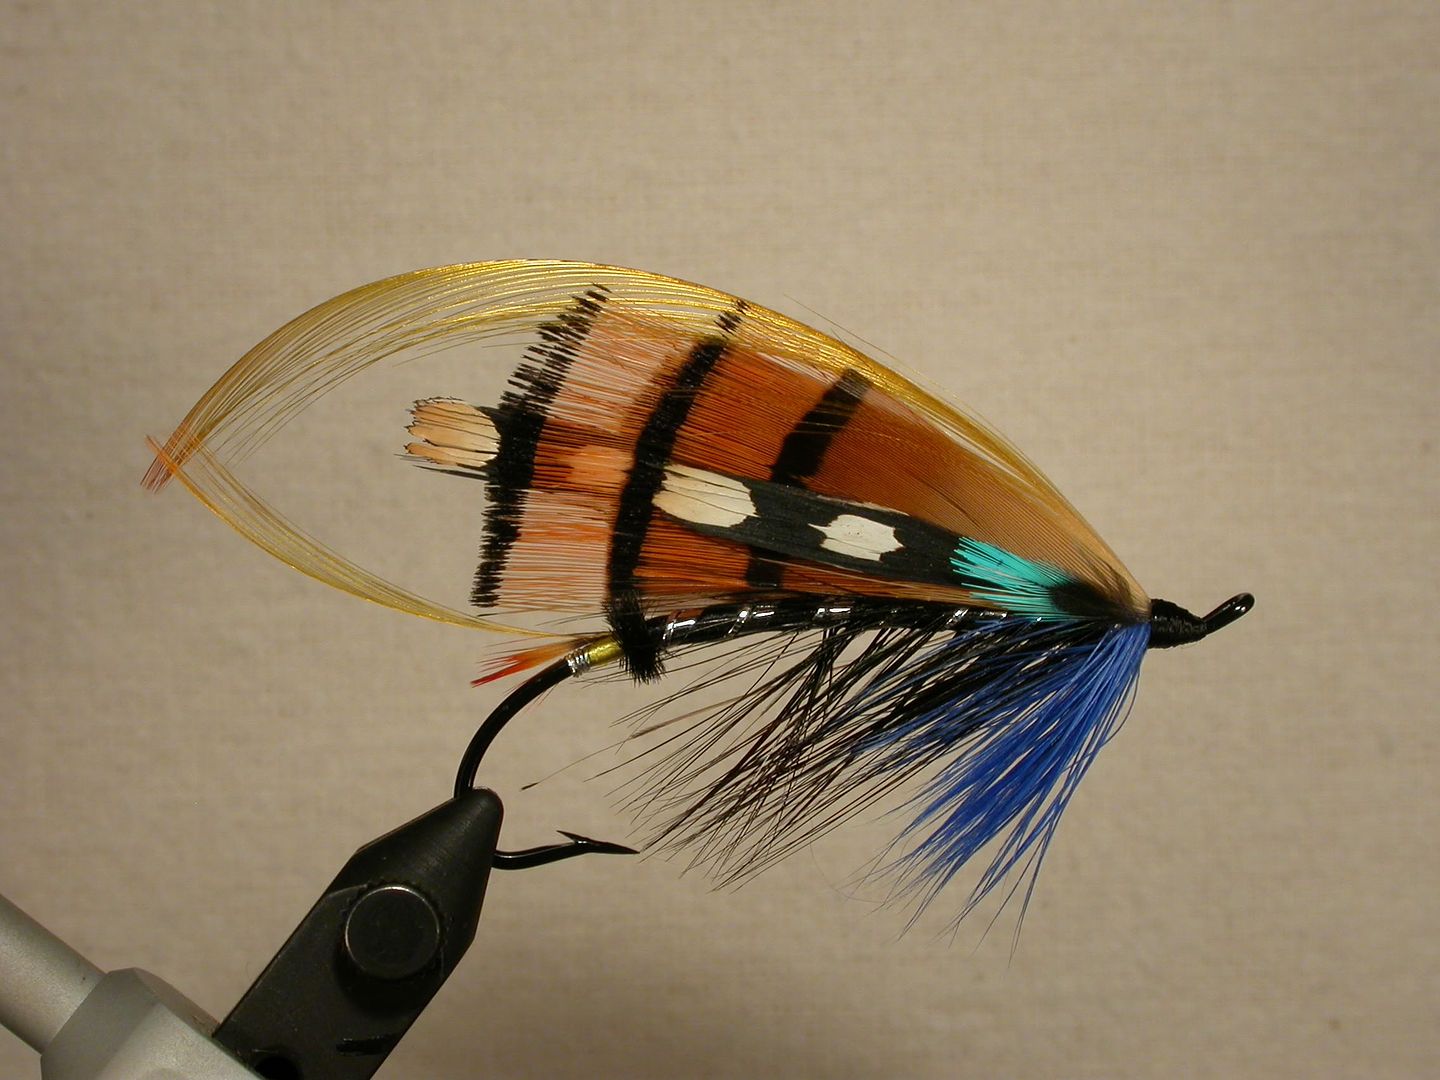
OK, here’s the second installment on the Black Ranger; the wing. This wing is much more substantial than the one on the Parson #1 and is actually made up of 5 different elements, if you count the cheeks. Each element is mounted separately, near and far sides, and tied in at the same time.
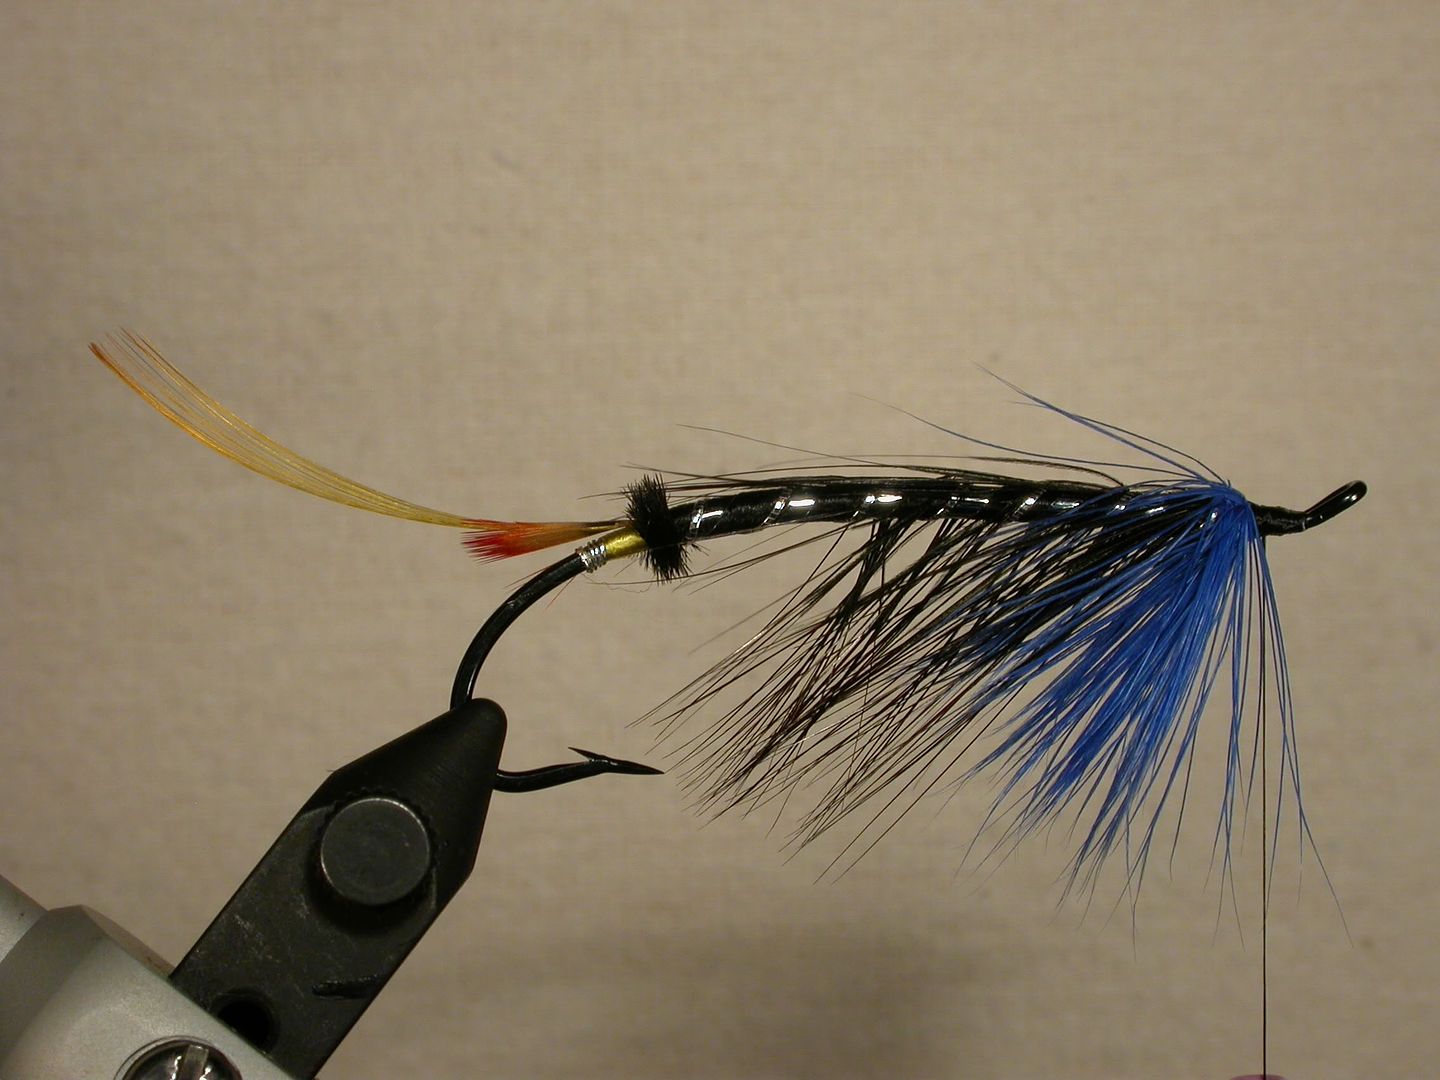
1. Back the thread down to the point where you have enough room at the head of the hook to tie in the wing materials and form a good head. Then, as with the Parson #1, use your bodkin to separate the barbs on the top of the hook and push them to the right or left, to create a flat surface for mounting the wing. Once they’re separated, pull the barbs diagonally down and towards the bend of the hook with your left thumb and forefinger. At the same time, use your right thumb and forefinger to pinch the barbs down along the sides of the body. It may take several pulls and pinches to get them to lie down the way you want them to.
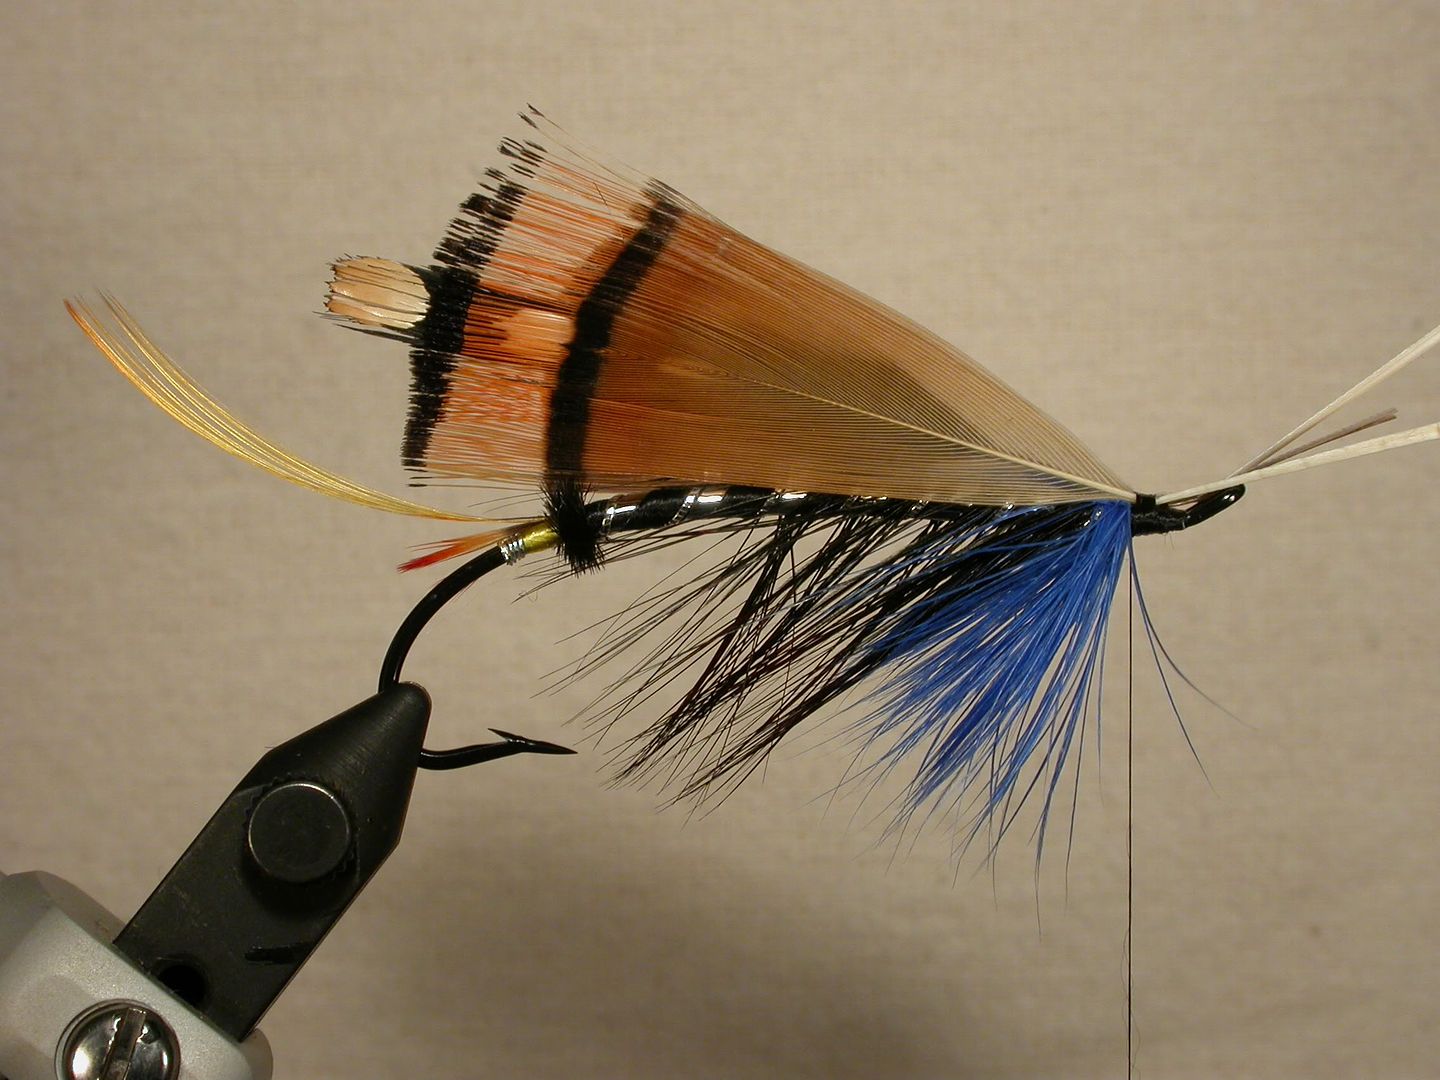
2. Now it’s time to start building the wing. Take two long Jungle Cock feathers ; called “nails” [you want these nails to reach to the back of the hook bend], place them dull side against each other and tie them in on the top of the hook with 3 flattened wraps. Ideally, you want the ends of this paired set of nails to be pointing at the tip of the Golden Pheasant topping tail. Leave some of the pre-nail barbs on the stem; it helps when mounting the Golden Pheasant tippets over these nails, but remove the first ¼ inch or so directly behind the point where you tie them in; this helps to make sure that you don’t see any of the pre-feathers when you tie in the Golden Pheasant tippet wings. You want these feathers tied in dead center on the top of the hook.

3. Next, take two long Golden Pheasant tippets; from the back of the neck; one from each side. Use your thumb fingernail, pinched against your index finger, to straighten the stem of each feather. Then, size the tippets. I use the butt on the body as a marker. I want the second band of the tippet (the inner band) to line up just above the butt, so that they’re a distinct butt and tippet black band on the fly. Remove enough of the barbs from each tippet to get them to start just behind the tie-in point. As with the Parson #1, don’t forget to notch the tippet with your thumbnail at the point where you want to tie it in. First mount the far side tippet, hold it in place with tension from your left index finger (I’m assuming that you’re a right handed tyer). Then mount the near side tippet and hold it in place with tension from your left thumb. Tie in both tippets at the same time using 3-4 flattened wraps. [ Note: the position of the tippet stems should be just below the Jungle Cock nail stems, not on top of them. Each feather that you mount will be mounted just below the previous one. This is important.] You want the paired Jungle Cock nails that you tied in previously to emanate from the middle of the tippet wing.
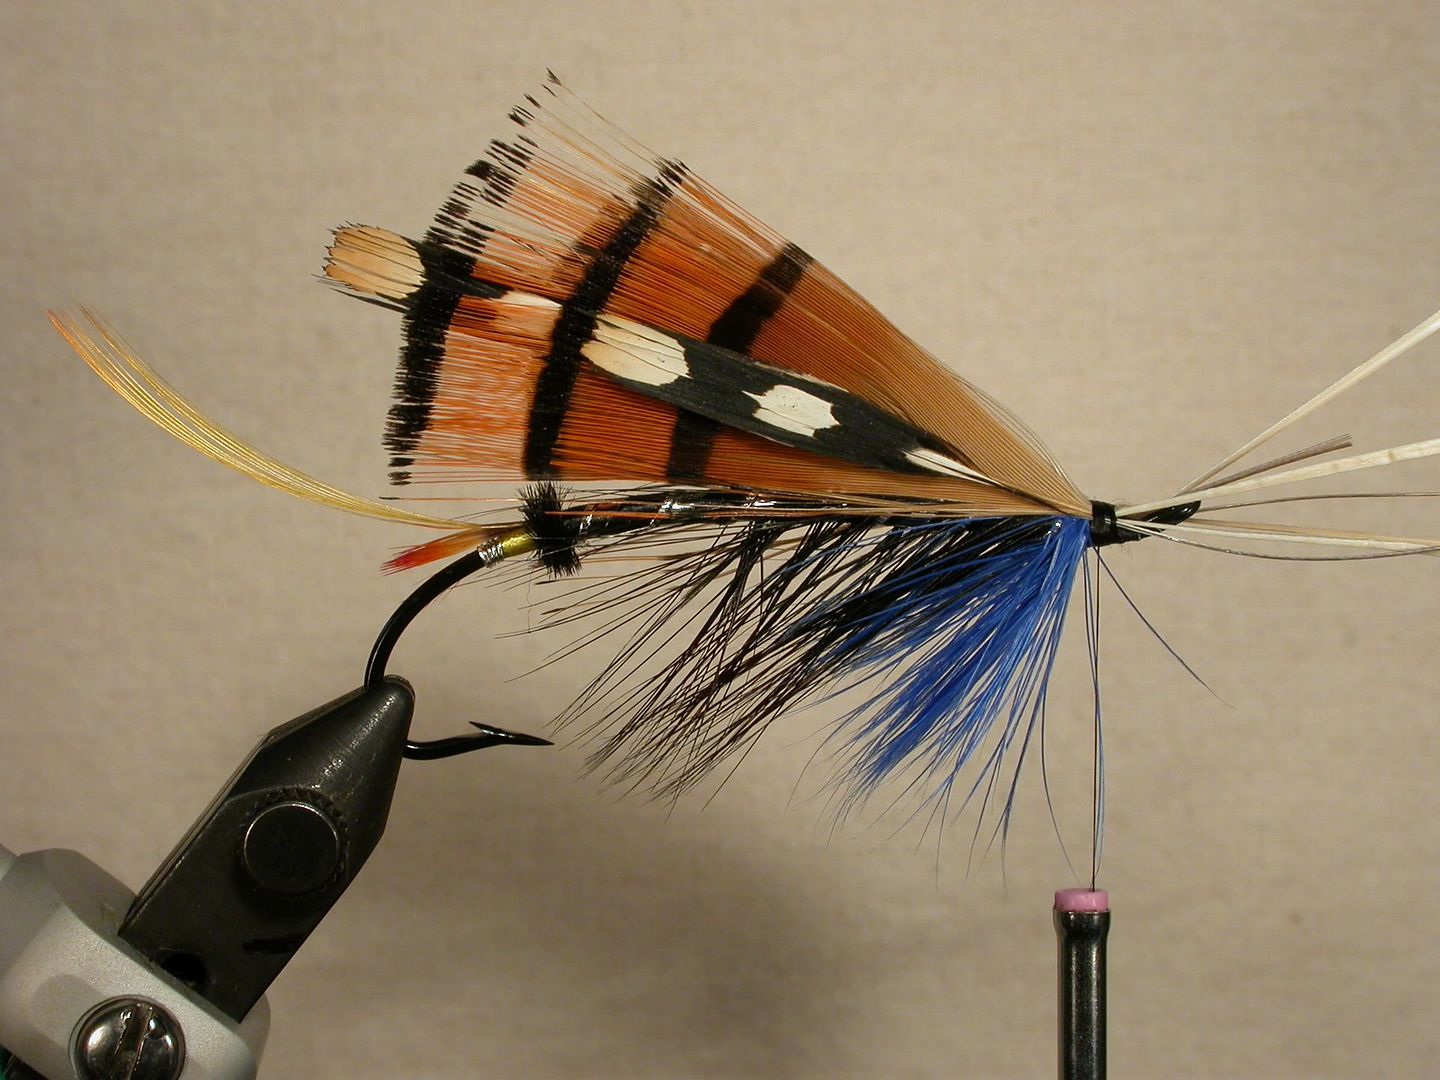
4. Now, it's time to add the second tippet feathers. These should be taken from further up on the neck; again, one from each side of the neck. Size these second tippets so that the outer black band lines up with the inner black bank on the first paired tippet feathers. Remove enough tippet fibers to have them start to emanate from the point where you want to tie them in. Don’t forget to notch this second tippet pair at the point where you want to tie them in. As with the first tippet pair, first mount the far side tippet and hold it in place with tension from your left index finger. Then mount the near side tippet and hold it in place with tension from the left thumb. Tie them both in at the same time with 3-4 flattened wraps. As with the first tippet pair, you want the stem of the second paid to lie below those of the first; not on top of them. This is important.

5. Next, tie in the second pair of Jungle Cock nails. These nails should be taken from towards the back of the neck. They need to be large enough to reach to the second of the three bands that you now have after tying in the two tippet pairs. As before, take one from each side and straighten the stems with pressure from your thumb nail against your index finger. Remove all of the pre-nail barbs (the grayish brown barbs), so that the nail looks clean. Now, mount the far side nail and hold it in place with pressure from your left index finger, then mount the near side nail and hold it in place with pressure from your left thumb. Tie both nails in together with 3-4 flattened wraps. Once again, you want the stems of this second pair of nails to lie just below the stems of the second tippet pair, not on top of them (I know, I sound like a broken record, but this is really an important part of getting the feathers to lay well on the hook.]
6. That’s it for the wing. Now it’s time to tie in the cheeks. The pattern calls for Blue Chatterer, which is also called Cotinga. There are 6-7 species of Cotinga and each is very rare and the feathers are very expensive to purchase. There are many Chatterer subs. Some of the best are ringneck pheasant, with the white band dyed blue. [Note: originally, before tyers started using Chatterer, they used Kingfisher; particularly the Asian Kingfisher. The problem with Kingfisher is that it looks gray in the water, whereas Chatterer stays blue. But, if you want to use Kingfisher, then go ahead; you’ll be using the original blue cheek feathers.] I used Cotinga cayana on my tie, so that you can get an idea of what the feathers looks like. You can probably see from the color why some tyers use a Silver Doctor blue throat hackle instead of the medium blue; it simply goes better with the Chatterer cheeks. Remove the fuzzy barbs at the base of the feather, leaving the blue tip and a small amount of the gray or black pre-barbs. Mount the far side cheek first and hold it in place with pressure from your left index finger, then mount the nearside cheek and hold it in place with pressure from your left thumb. Tie in both cheeks at the same time using 3-4 flattened wraps. Again, the stems of the cheeks should lie just below the stems for the second pair of Jungle Cock nails.
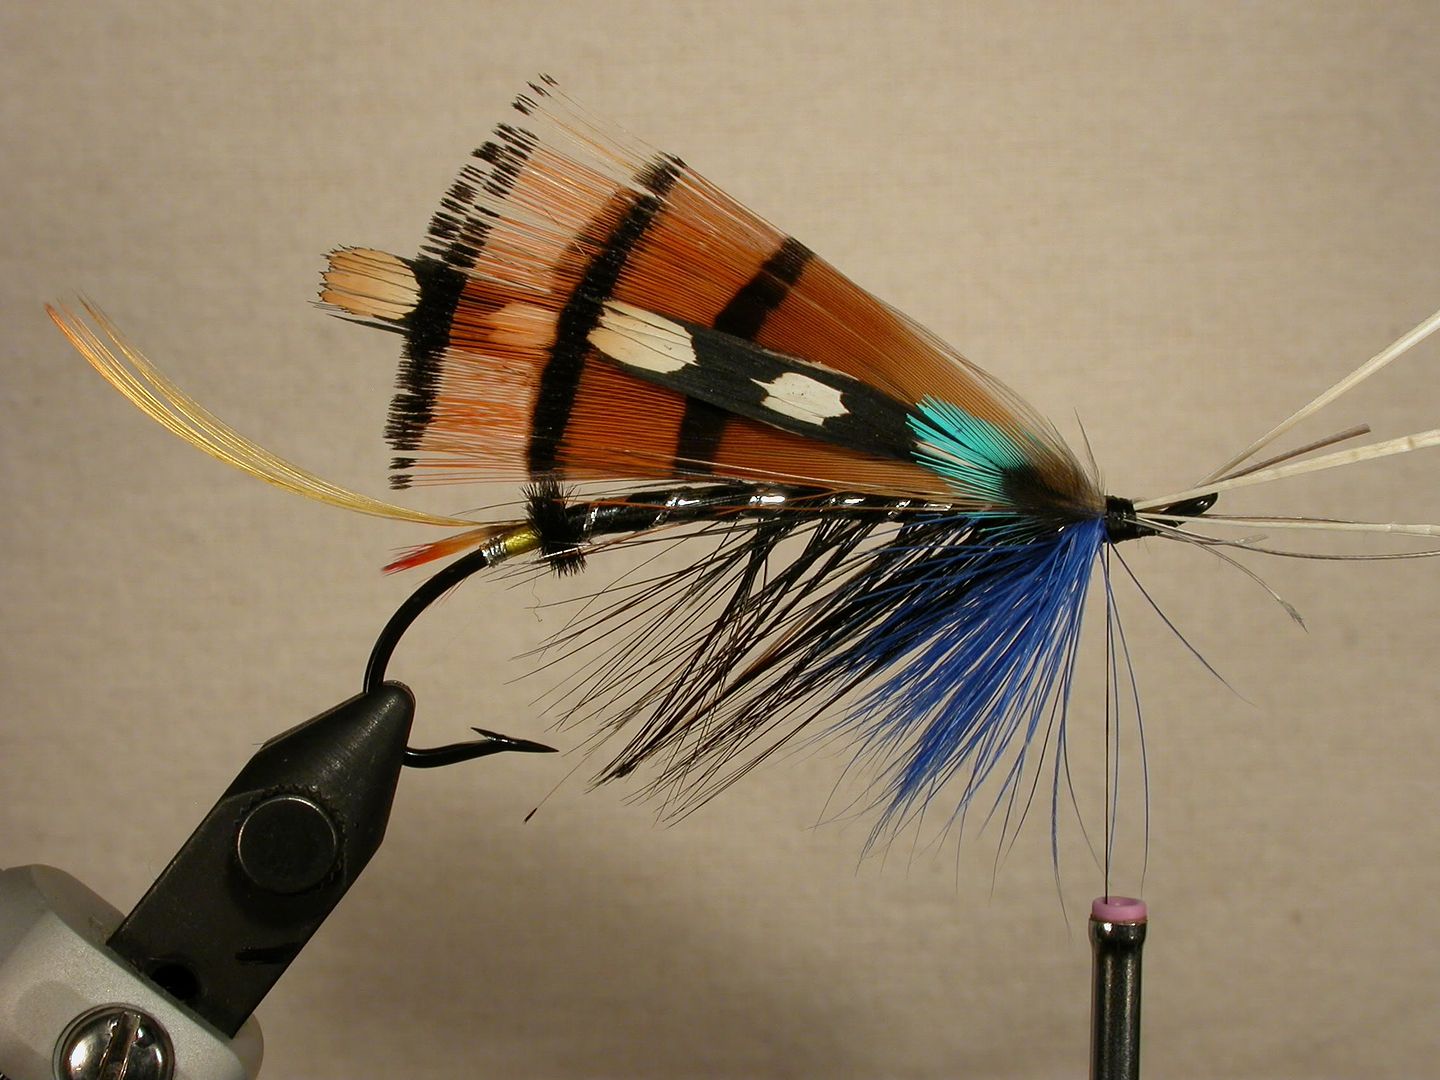
7. Now it’s time to mount the topping. Pick out a long Golden Pheasant neck feather; topping. Measure it so that when it’s mounted at the head, its end meets the end of the topping tail that you tied in when you formed he body. Notch the topping at the point where you want to tie it in and strip off all of the barbs from the tie-in notch to the base of the step. Flatten the stem from the tie-in point towards the base by running the base of the stem between your thumb nail and forefinger. Place the topping right on top of the first set of Jungle Cock nail stems; right on top of the hook. Tie in the topping with 4-5 flattened wraps
.
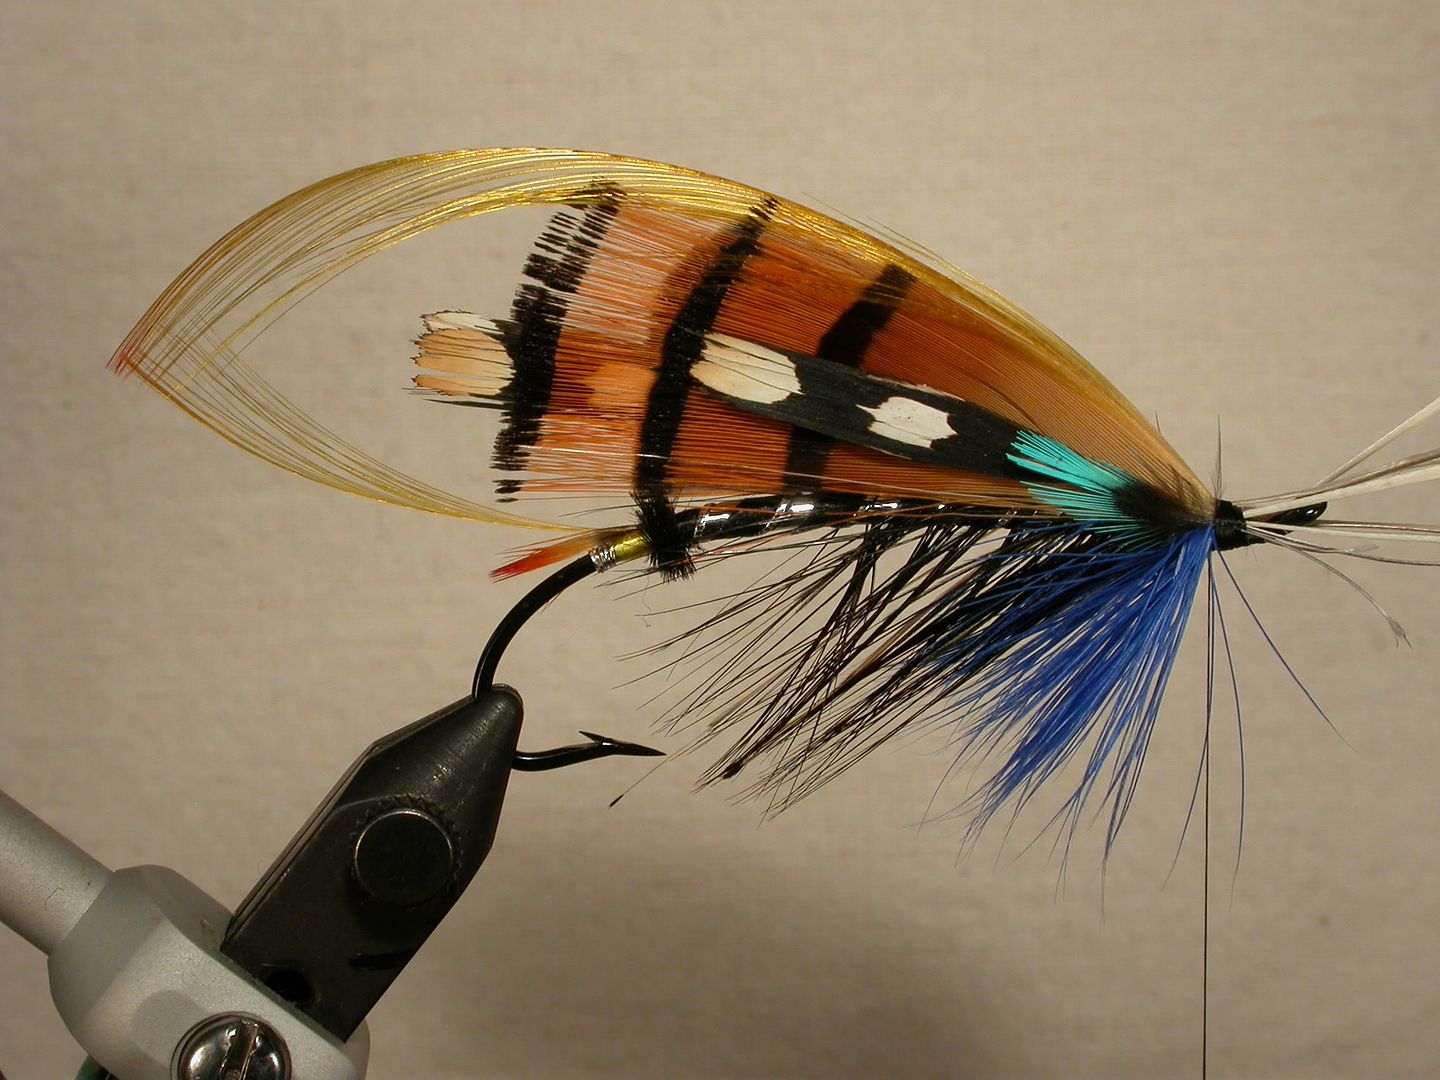
[Note: I did not mount the horns that are called for in this pattern. It’s a matter of person preference and I like the looks of the fly better with just the topping. To see how this pattern looks with horns, see Rocky’s post on p. 24 of this thread.]
8. Next, it time to trim off all the waste ends. Before I do this, I add a drop of Zap-a-Gap, thin; just to hold everything in place. Once it’s dried, I hold all of the wing components firmly between my left thumb and forefinger, then I cut the waste ends off at an angle; from lower right to upper left, using a sharp curved pair of scissors. Then finish the head with the tying thread; taking care to cover up all of the waste ends. Use a double whip finish and your fly is complete.
9. Finish the head if you want with 2-3 coats of SHHAN or other shiny-when-dry head cement.

That’s it! You’ve just tied up the Black Ranger pattern. I hope you had fun with it.
Pocono
Black Ranger - Step-by-Step - The Wing
As described by T. Pryce-Tannatt is his book: How to Dress Salmon Flies: A Handbook for Amateurs.
OK, here’s the second installment on the Black Ranger; the wing. This wing is much more substantial than the one on the Parson #1 and is actually made up of 5 different elements, if you count the cheeks. Each element is mounted separately, near and far sides, and tied in at the same time.
1. Back the thread down to the point where you have enough room at the head of the hook to tie in the wing materials and form a good head. Then, as with the Parson #1, use your bodkin to separate the barbs on the top of the hook and push them to the right or left, to create a flat surface for mounting the wing. Once they’re separated, pull the barbs diagonally down and towards the bend of the hook with your left thumb and forefinger. At the same time, use your right thumb and forefinger to pinch the barbs down along the sides of the body. It may take several pulls and pinches to get them to lie down the way you want them to.
2. Now it’s time to start building the wing. Take two long Jungle Cock feathers ; called “nails” [you want these nails to reach to the back of the hook bend], place them dull side against each other and tie them in on the top of the hook with 3 flattened wraps. Ideally, you want the ends of this paired set of nails to be pointing at the tip of the Golden Pheasant topping tail. Leave some of the pre-nail barbs on the stem; it helps when mounting the Golden Pheasant tippets over these nails, but remove the first ¼ inch or so directly behind the point where you tie them in; this helps to make sure that you don’t see any of the pre-feathers when you tie in the Golden Pheasant tippet wings. You want these feathers tied in dead center on the top of the hook.
3. Next, take two long Golden Pheasant tippets; from the back of the neck; one from each side. Use your thumb fingernail, pinched against your index finger, to straighten the stem of each feather. Then, size the tippets. I use the butt on the body as a marker. I want the second band of the tippet (the inner band) to line up just above the butt, so that they’re a distinct butt and tippet black band on the fly. Remove enough of the barbs from each tippet to get them to start just behind the tie-in point. As with the Parson #1, don’t forget to notch the tippet with your thumbnail at the point where you want to tie it in. First mount the far side tippet, hold it in place with tension from your left index finger (I’m assuming that you’re a right handed tyer). Then mount the near side tippet and hold it in place with tension from your left thumb. Tie in both tippets at the same time using 3-4 flattened wraps. [ Note: the position of the tippet stems should be just below the Jungle Cock nail stems, not on top of them. Each feather that you mount will be mounted just below the previous one. This is important.] You want the paired Jungle Cock nails that you tied in previously to emanate from the middle of the tippet wing.
4. Now, it's time to add the second tippet feathers. These should be taken from further up on the neck; again, one from each side of the neck. Size these second tippets so that the outer black band lines up with the inner black bank on the first paired tippet feathers. Remove enough tippet fibers to have them start to emanate from the point where you want to tie them in. Don’t forget to notch this second tippet pair at the point where you want to tie them in. As with the first tippet pair, first mount the far side tippet and hold it in place with tension from your left index finger. Then mount the near side tippet and hold it in place with tension from the left thumb. Tie them both in at the same time with 3-4 flattened wraps. As with the first tippet pair, you want the stem of the second paid to lie below those of the first; not on top of them. This is important.
5. Next, tie in the second pair of Jungle Cock nails. These nails should be taken from towards the back of the neck. They need to be large enough to reach to the second of the three bands that you now have after tying in the two tippet pairs. As before, take one from each side and straighten the stems with pressure from your thumb nail against your index finger. Remove all of the pre-nail barbs (the grayish brown barbs), so that the nail looks clean. Now, mount the far side nail and hold it in place with pressure from your left index finger, then mount the near side nail and hold it in place with pressure from your left thumb. Tie both nails in together with 3-4 flattened wraps. Once again, you want the stems of this second pair of nails to lie just below the stems of the second tippet pair, not on top of them (I know, I sound like a broken record, but this is really an important part of getting the feathers to lay well on the hook.]
6. That’s it for the wing. Now it’s time to tie in the cheeks. The pattern calls for Blue Chatterer, which is also called Cotinga. There are 6-7 species of Cotinga and each is very rare and the feathers are very expensive to purchase. There are many Chatterer subs. Some of the best are ringneck pheasant, with the white band dyed blue. [Note: originally, before tyers started using Chatterer, they used Kingfisher; particularly the Asian Kingfisher. The problem with Kingfisher is that it looks gray in the water, whereas Chatterer stays blue. But, if you want to use Kingfisher, then go ahead; you’ll be using the original blue cheek feathers.] I used Cotinga cayana on my tie, so that you can get an idea of what the feathers looks like. You can probably see from the color why some tyers use a Silver Doctor blue throat hackle instead of the medium blue; it simply goes better with the Chatterer cheeks. Remove the fuzzy barbs at the base of the feather, leaving the blue tip and a small amount of the gray or black pre-barbs. Mount the far side cheek first and hold it in place with pressure from your left index finger, then mount the nearside cheek and hold it in place with pressure from your left thumb. Tie in both cheeks at the same time using 3-4 flattened wraps. Again, the stems of the cheeks should lie just below the stems for the second pair of Jungle Cock nails.
7. Now it’s time to mount the topping. Pick out a long Golden Pheasant neck feather; topping. Measure it so that when it’s mounted at the head, its end meets the end of the topping tail that you tied in when you formed he body. Notch the topping at the point where you want to tie it in and strip off all of the barbs from the tie-in notch to the base of the step. Flatten the stem from the tie-in point towards the base by running the base of the stem between your thumb nail and forefinger. Place the topping right on top of the first set of Jungle Cock nail stems; right on top of the hook. Tie in the topping with 4-5 flattened wraps
.
[Note: I did not mount the horns that are called for in this pattern. It’s a matter of person preference and I like the looks of the fly better with just the topping. To see how this pattern looks with horns, see Rocky’s post on p. 24 of this thread.]
8. Next, it time to trim off all the waste ends. Before I do this, I add a drop of Zap-a-Gap, thin; just to hold everything in place. Once it’s dried, I hold all of the wing components firmly between my left thumb and forefinger, then I cut the waste ends off at an angle; from lower right to upper left, using a sharp curved pair of scissors. Then finish the head with the tying thread; taking care to cover up all of the waste ends. Use a double whip finish and your fly is complete.
9. Finish the head if you want with 2-3 coats of SHHAN or other shiny-when-dry head cement.
That’s it! You’ve just tied up the Black Ranger pattern. I hope you had fun with it.
Pocono
Last edited: