
Pocono
Moderator
The Jock Scott - Step-by-Step - The Wing
As described by T. Pryce-Tannatt in his book: How to Dress Salmon Flies: A Handbook for Amateurs.
Well, here we go with the wing for this pattern; not a simple one for sure! The underwing is simpler than that on the Silver Doctor, but the additional materials that are added after the married wing is mounted make this pattern, to me, a more challenging one.
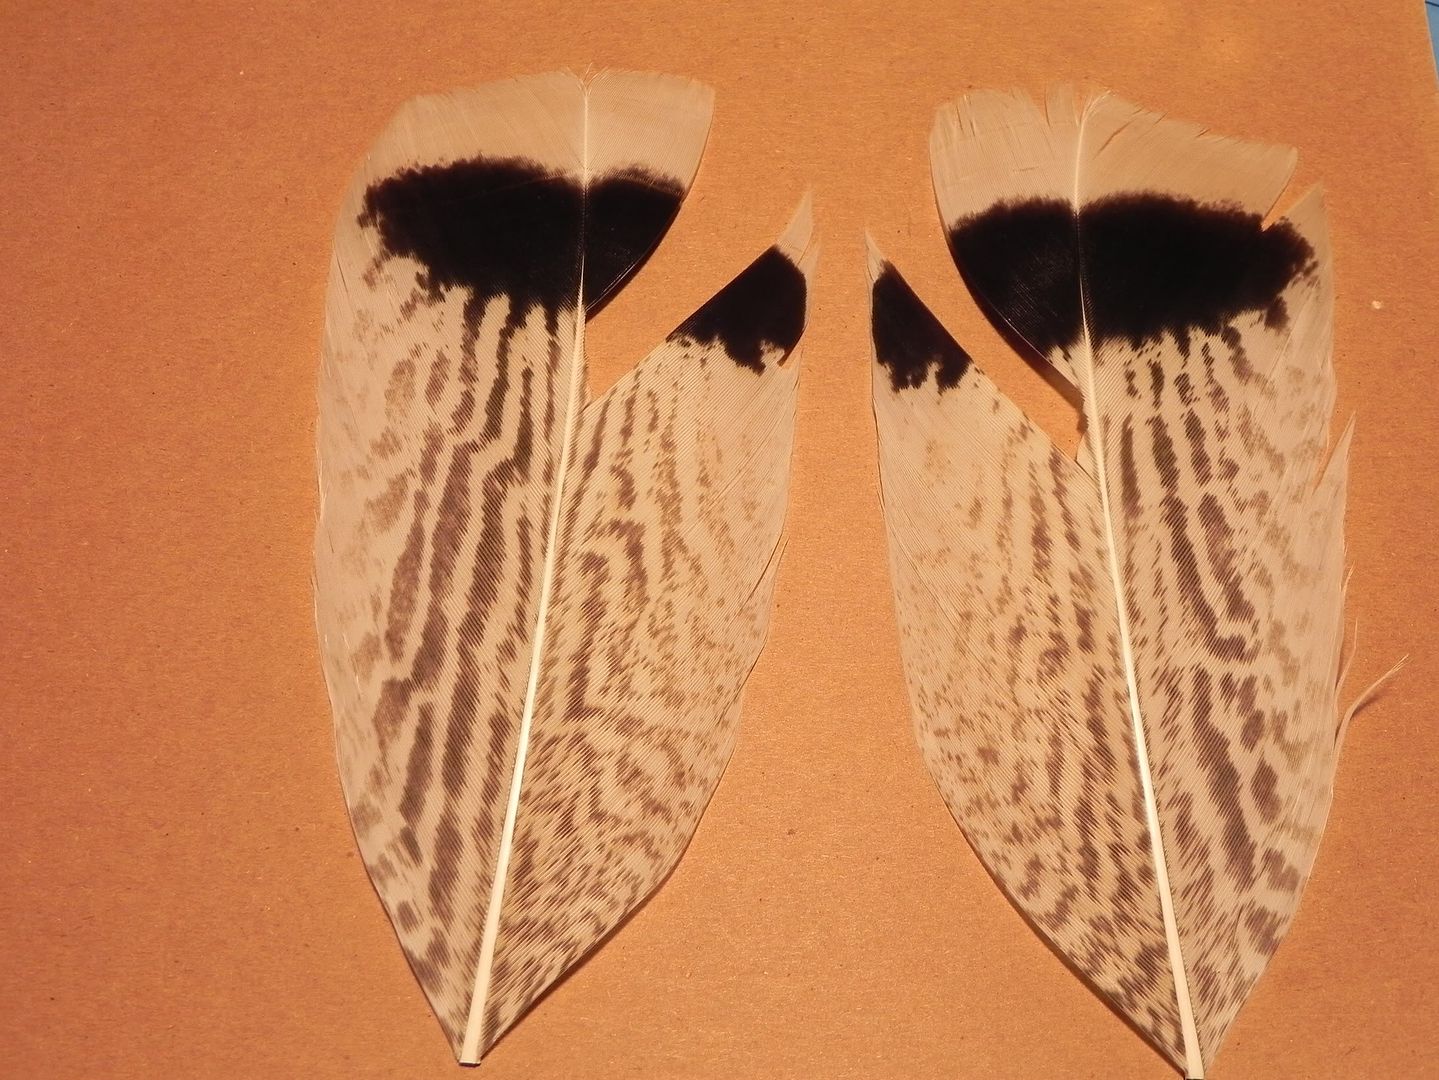
1. Starting with the hackled body, cut two wing slips from right and left halves of a white tipped Turkey tail. [Note: white-tipped Turkey was an item that nobody had in stock, for some reason. So, John at FeathersMC shipped me out some Royal Palm, which has the same kind of white tip as the real McCoy.]
2. Pair the white turkey slips, back-to-back and mount them on the top of the hook, so that they’re centered. [It’s important on any pattern that has an underwing, to get that wing mounted in a perfectly centered position, because all of the other wing materials sit on top of it. If it’s not straight down the hook shank, then nothing that you tie in later will be, either.]
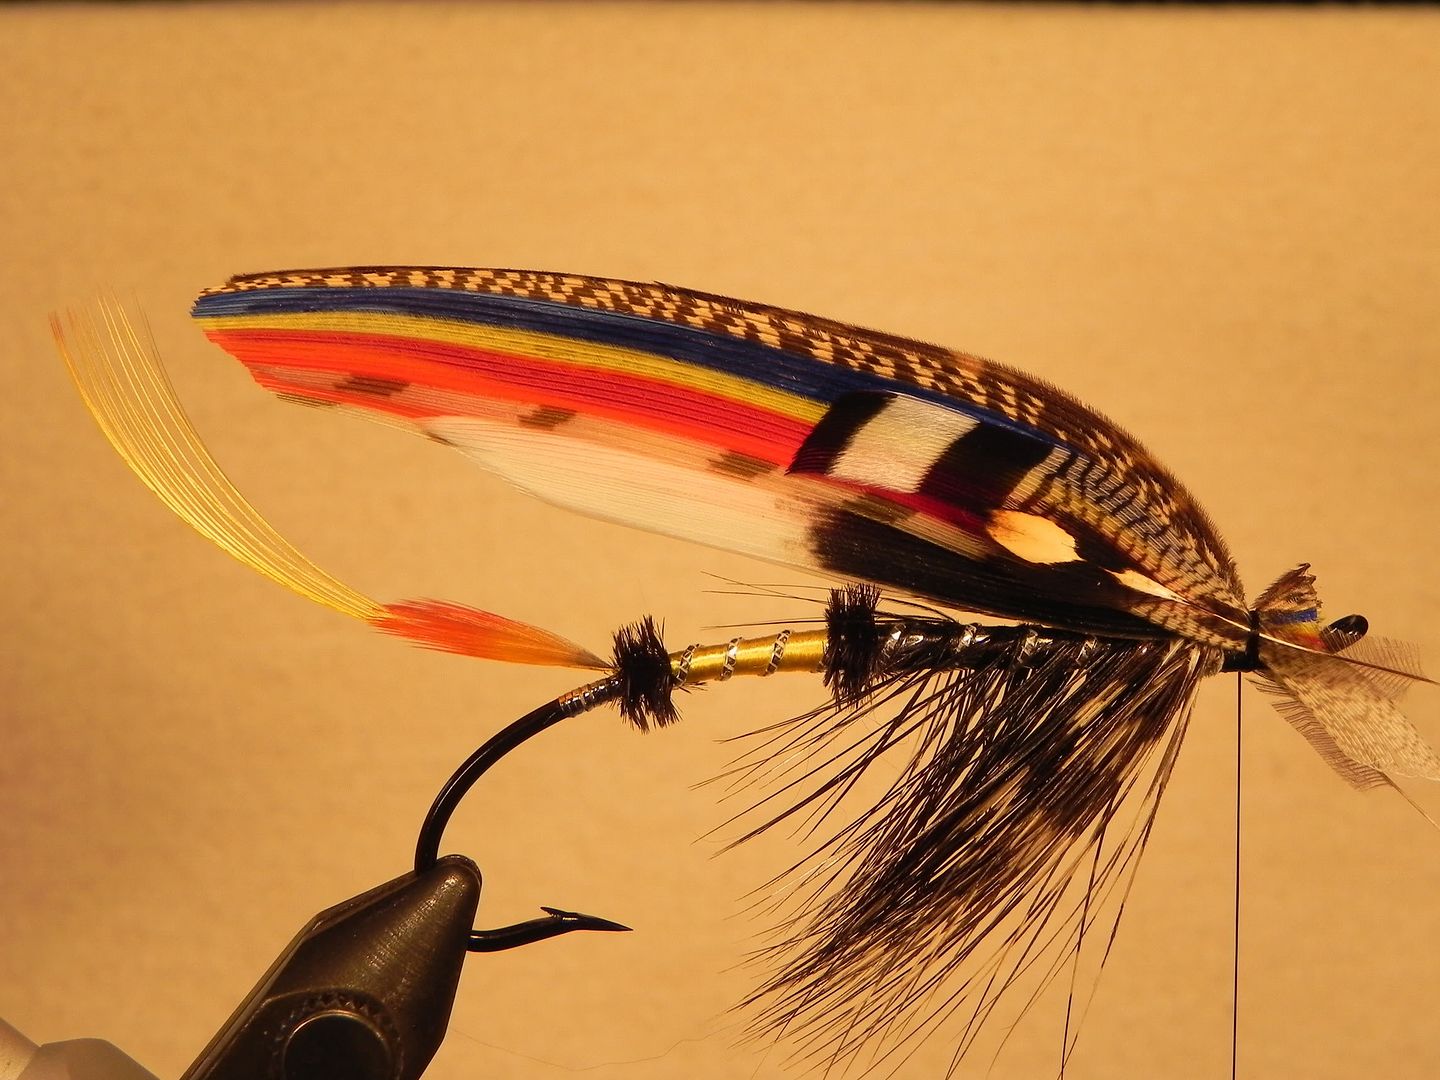
3. Next, form the married wing, the same way that you formed the married wing on the Silver Nurse and Silver Doctor patterns. The wing that I used followed Tom’s recipe. There are various recipes for the wing, as you’ll see from other posted pictures of this fly. I used: Florican Bustard sub., dyed Red Turkey, dyed Yellow Turkey, dyed Blue Turkey, Kori Bustard and mottled brown Turkey; from the bottom to the top. Here are the two married wings formed up:

4. Now, pair the married wings, back-to-back and mount them on top of the hook as you would with any slip wing pattern. [Note: some days are good days and others are not so good. On a good day, the married wing might mount well on your first try; on a bad day, it might be your 15th try. For me, it was my 7th try. Don’t worry too much about the married wing not being usable after you’ve tied it in and taken it off; they’re tougher than you might think. Just smooth them back together with your thumb and forefinger and they will come right back to life for you.] Be sure to hump the wing, so that it will lie just on top of the white-tipped Turkey, with the top half of the underwing showing.

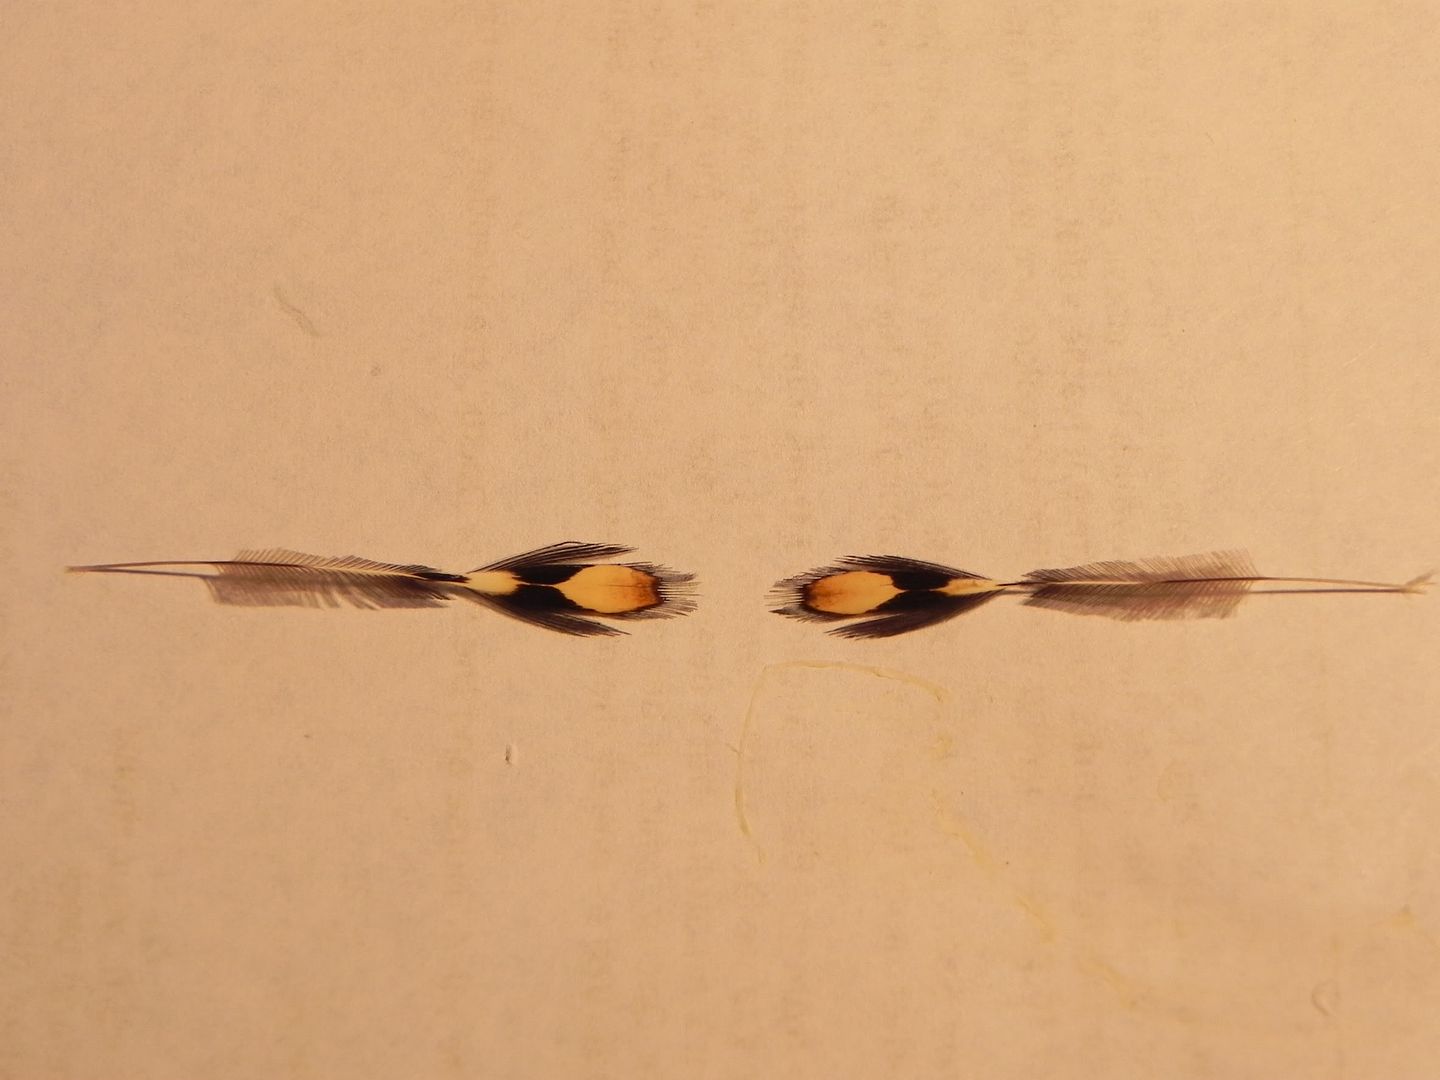
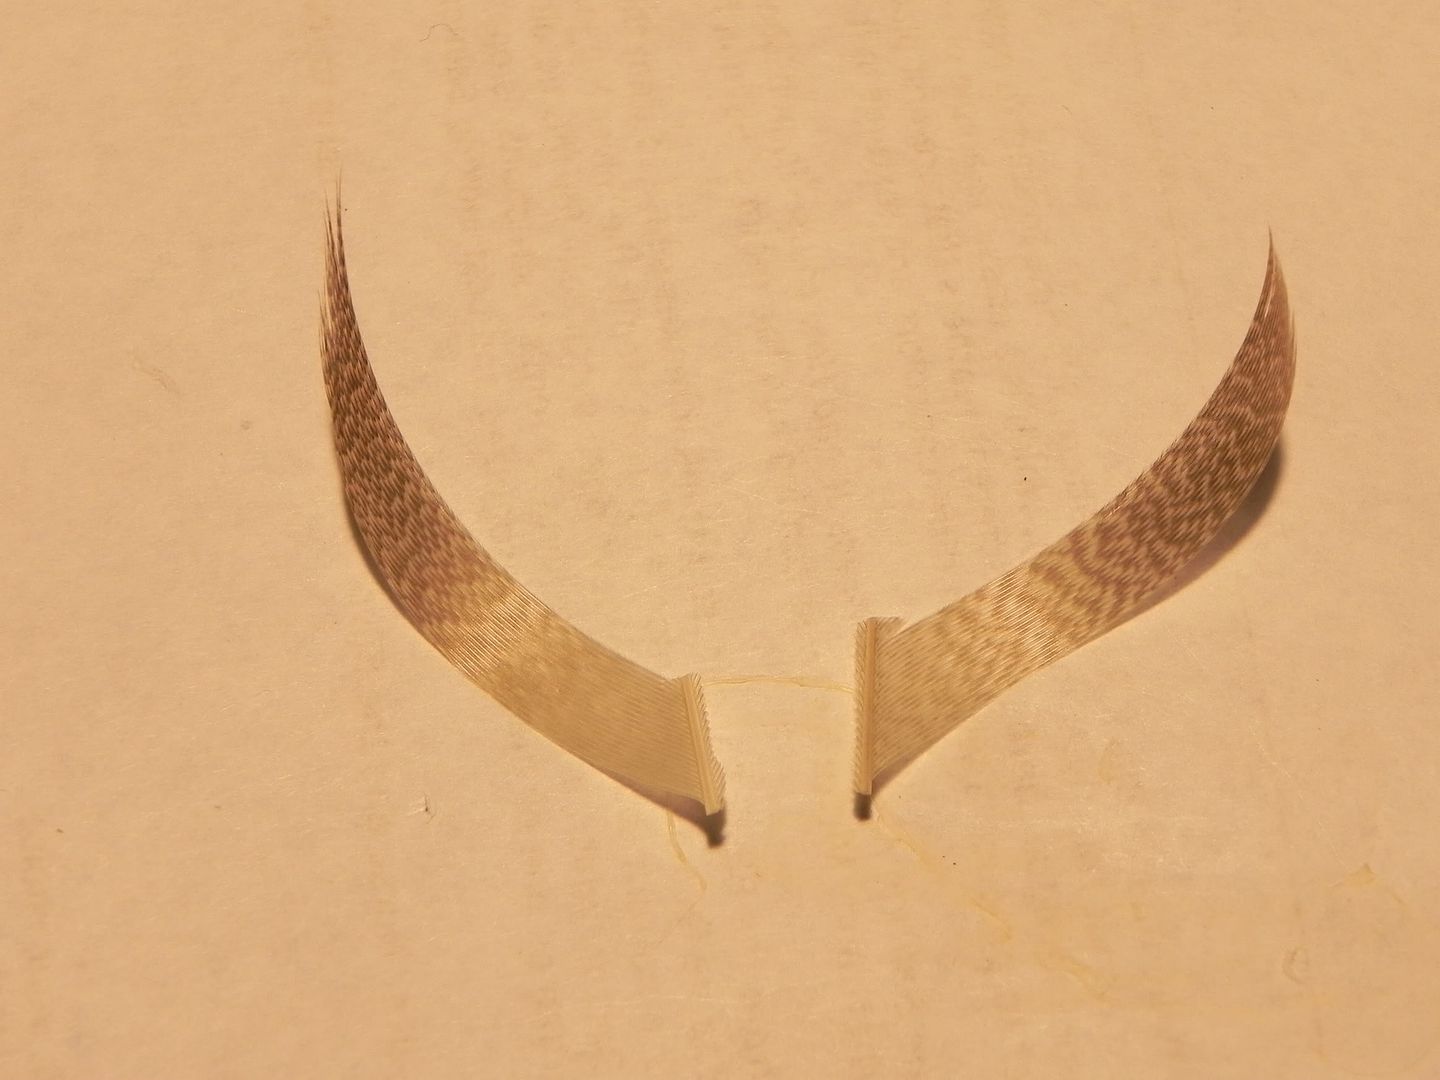
5. Now, it’s time to start adding the peripheral feathers that make up this pattern. The first are the shoulders, which are made up of barred Wood Duck married to Pintail Duck (or Gadwall Duck). These feathers wouldn’t marry well for me, so I mounted just the barred Wood Duck, with a slightly wider slip. Here are the barred Wood Duck slips; taken from a right and a left feather:

6. Mount the barred Wood Duck/Pintail on either side of the married wing; just above the mid-point on the married wing:

7. Next, we add Jungle Cock nails. Here are two nails that have been prepared as Tom suggests; leaving short barbs below the tie-in point; in order to get better “anchorage” of the feather when it’s tied in. It makes the stem of the feather look “fuzzy”, which is what give it a better attachment under the thread.
8. Mount the Jungle Cock nails on either side of the married wing; just below the mid-line on the married wing, with the tips just inside of the barring on the Wood Duck slip:
9. Next, form the mallard roof; the same way that you did for the Silver Doctor pattern. Here are two mallard slips; taken from left and right mallard flank feathers:
10. Next, tie in the mallard slips on both sides of the leading edge of the married wing, so that it lies along the top of the wing when it’s completed:
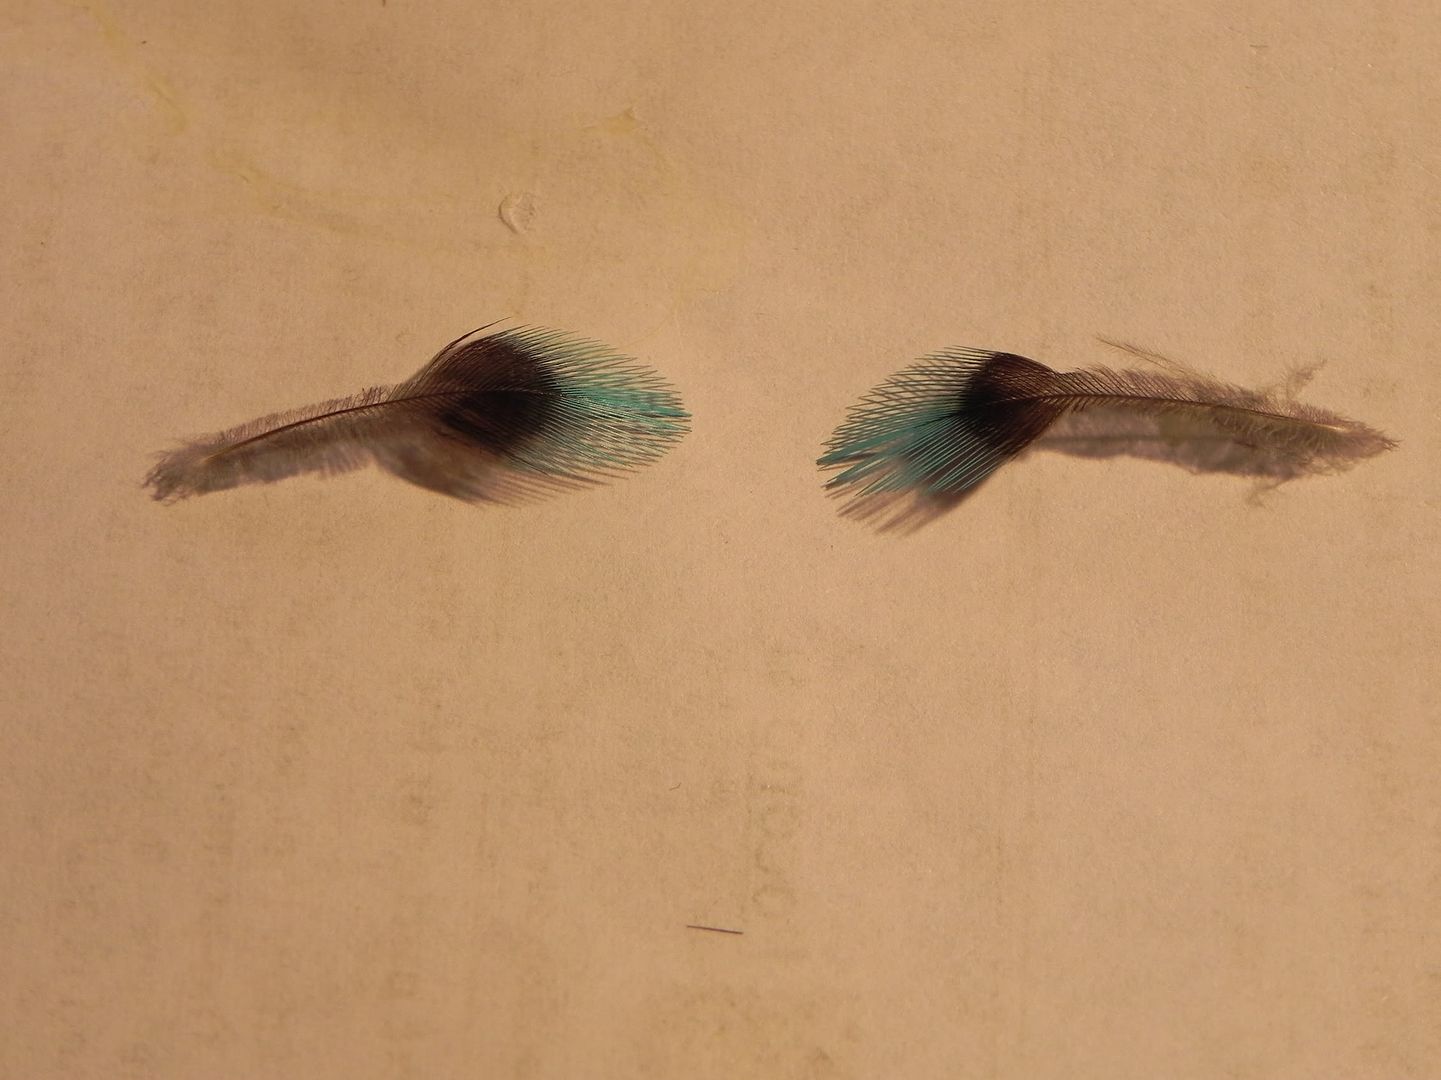
11. Next, add the Blue Chatterer cheeks. These are two Blue Chatterer feathers, prepped as Tom recommends, with scissor-trimmed short barbs just below the tie-in point, to add stability to the feather once it’s tied in. [Note: this is the real thing; Cotinga Cayana, not Kingfisher- I thought that this pattern deserved Blue Chatterer.]
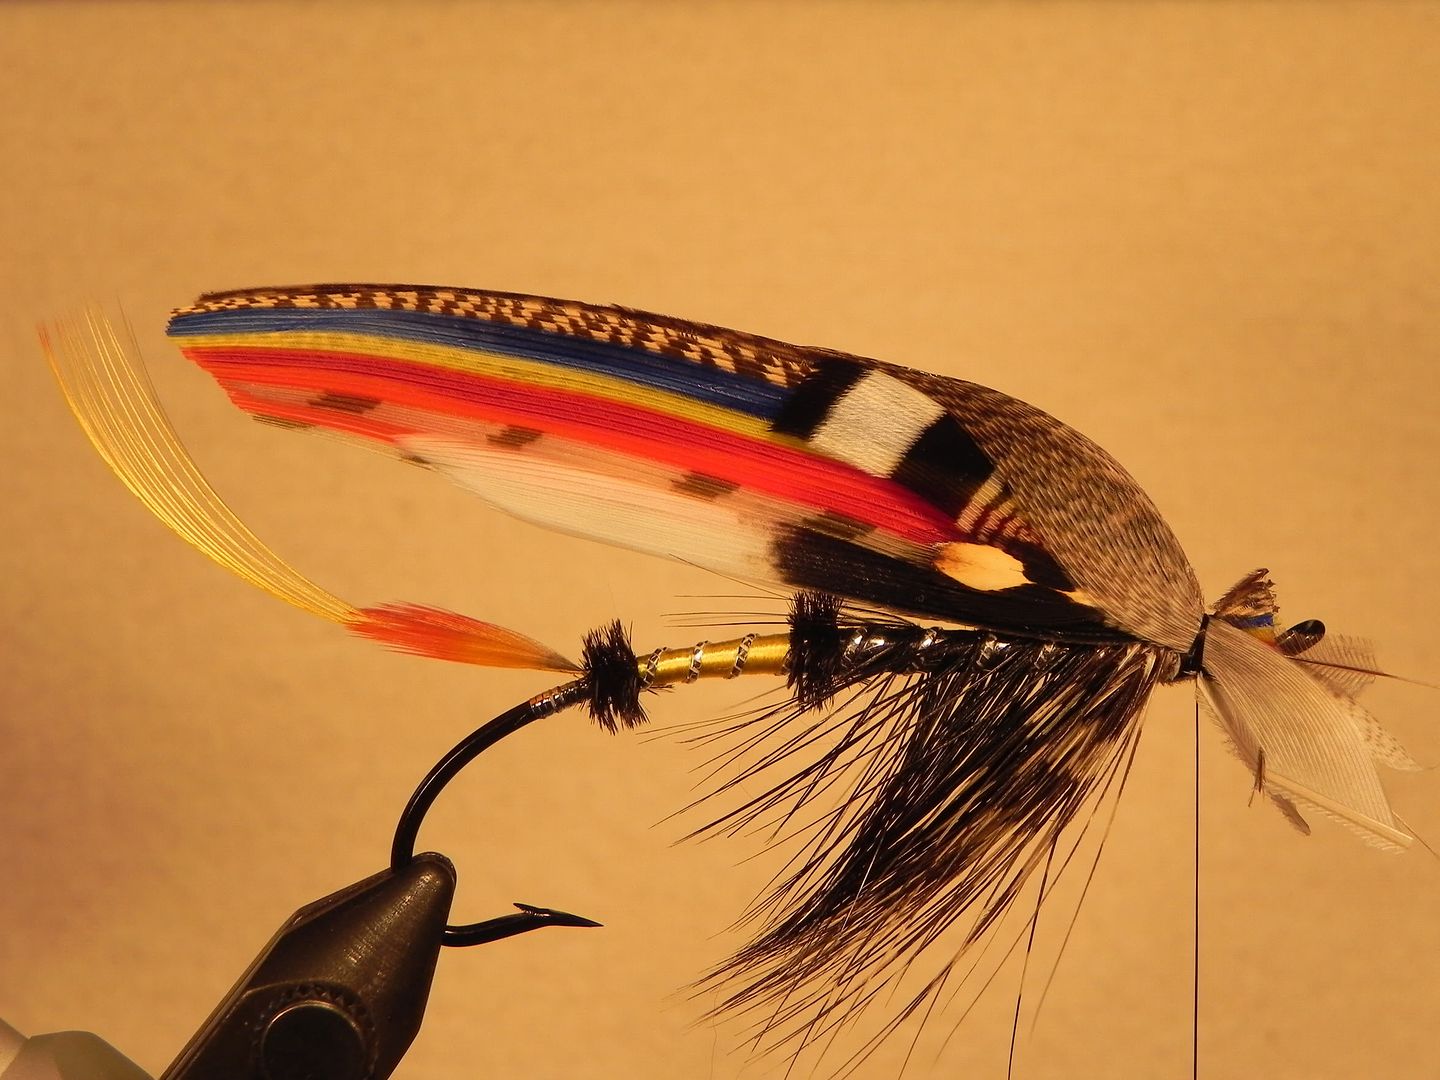
12. Trim them down to size and tie them in so that there’s a good amount of barred Wood Duck and Jungle Cock nail still showing.
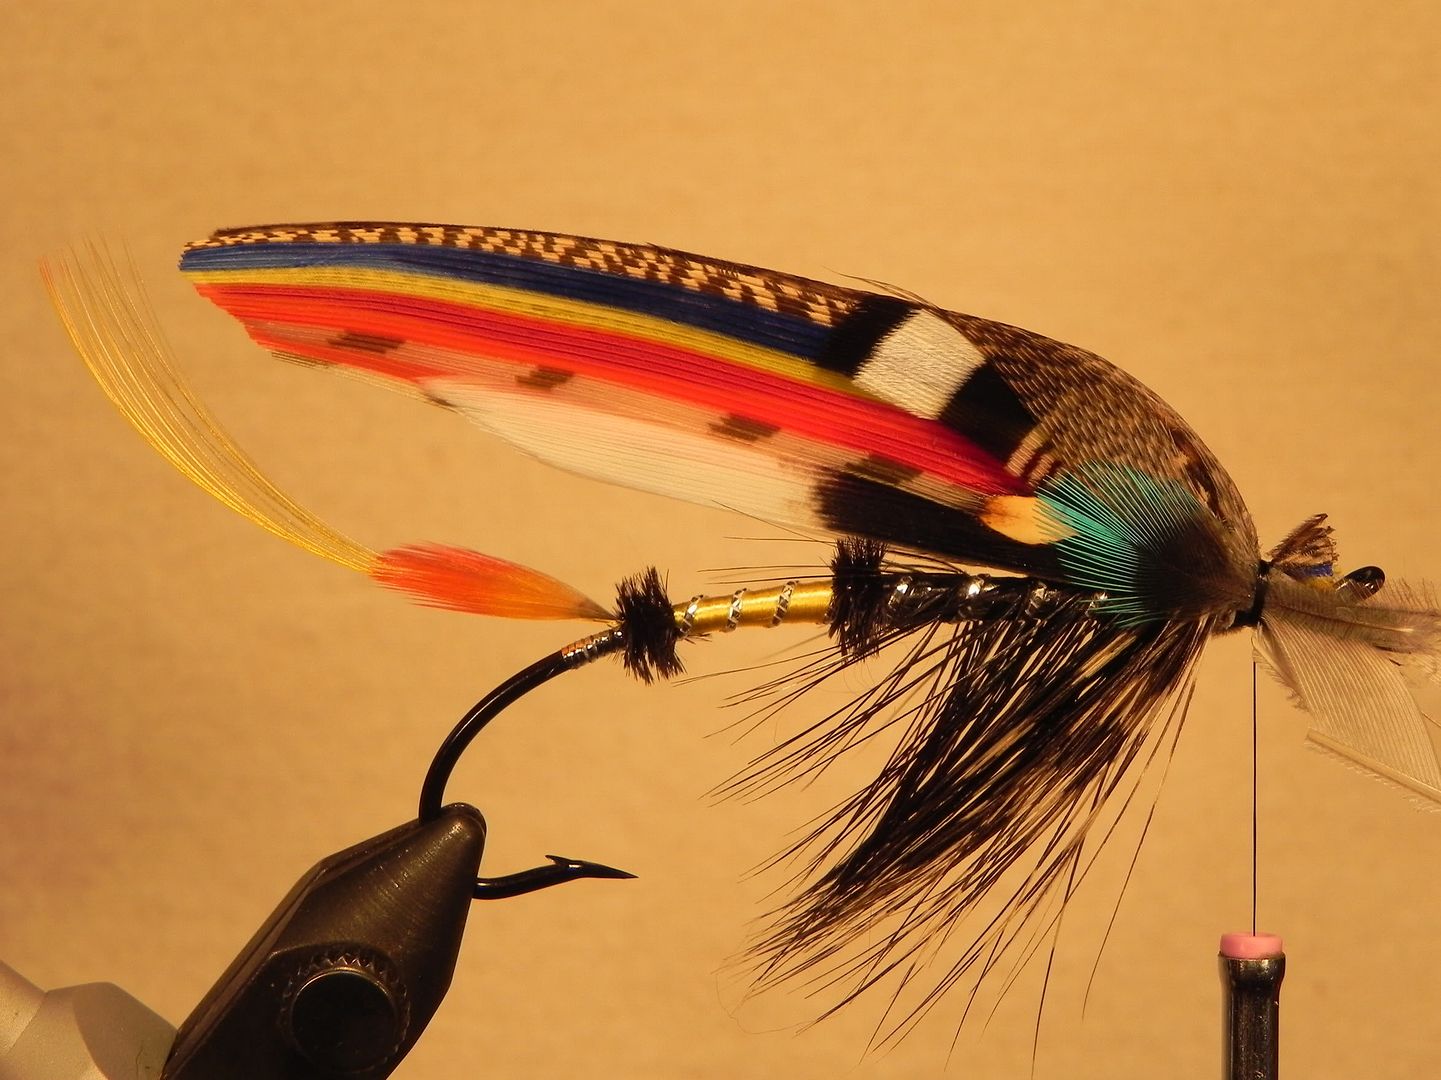
13. Next, select a Golden Pheasant topping, form it as you need it by pinching the stem between your thumb pad and index finger nail and once formed tie it in on top of the wing assembly. Be sure to notch the base of the stem where you want to tie it onto the hook. Then, mount it on top of the wing assembly, so that it compliments that GP tail.
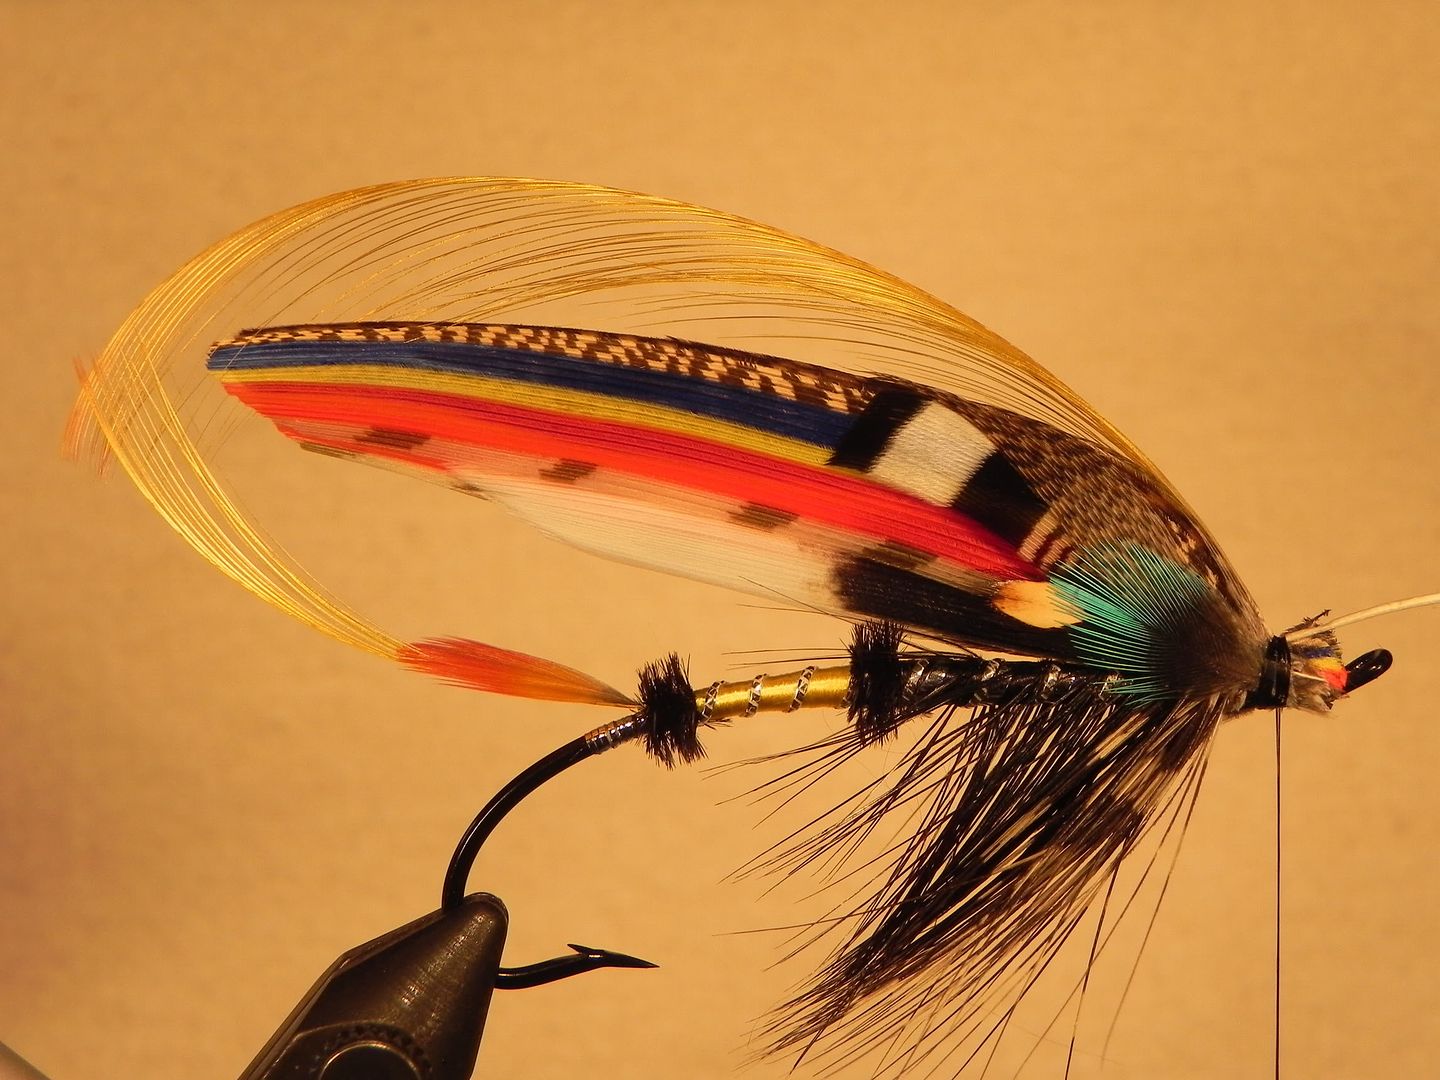
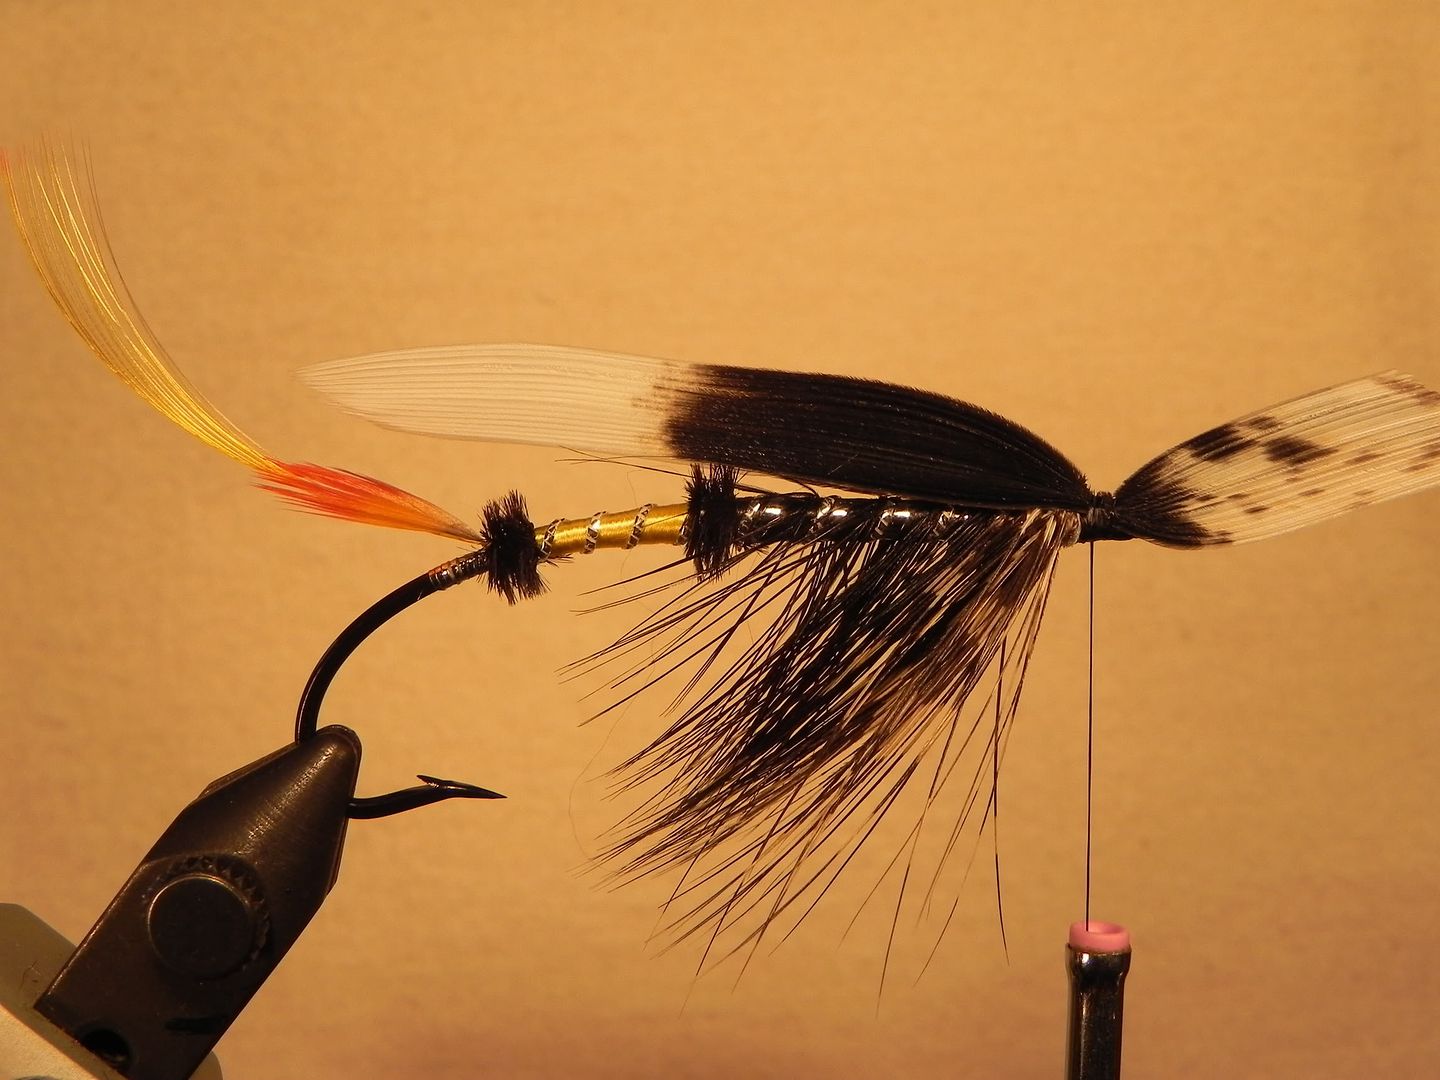
14. Finally, trim up the feather waste ends, form the head with tying thread and coat it 2-3 times with your favorite head cement. I use SHHAN; courtesy of Joni.

And that’s it; the Jock Scott!
As the man said……..”It’s all downhill from here!”
Pocono
As described by T. Pryce-Tannatt in his book: How to Dress Salmon Flies: A Handbook for Amateurs.
Well, here we go with the wing for this pattern; not a simple one for sure! The underwing is simpler than that on the Silver Doctor, but the additional materials that are added after the married wing is mounted make this pattern, to me, a more challenging one.
1. Starting with the hackled body, cut two wing slips from right and left halves of a white tipped Turkey tail. [Note: white-tipped Turkey was an item that nobody had in stock, for some reason. So, John at FeathersMC shipped me out some Royal Palm, which has the same kind of white tip as the real McCoy.]
2. Pair the white turkey slips, back-to-back and mount them on the top of the hook, so that they’re centered. [It’s important on any pattern that has an underwing, to get that wing mounted in a perfectly centered position, because all of the other wing materials sit on top of it. If it’s not straight down the hook shank, then nothing that you tie in later will be, either.]
3. Next, form the married wing, the same way that you formed the married wing on the Silver Nurse and Silver Doctor patterns. The wing that I used followed Tom’s recipe. There are various recipes for the wing, as you’ll see from other posted pictures of this fly. I used: Florican Bustard sub., dyed Red Turkey, dyed Yellow Turkey, dyed Blue Turkey, Kori Bustard and mottled brown Turkey; from the bottom to the top. Here are the two married wings formed up:
4. Now, pair the married wings, back-to-back and mount them on top of the hook as you would with any slip wing pattern. [Note: some days are good days and others are not so good. On a good day, the married wing might mount well on your first try; on a bad day, it might be your 15th try. For me, it was my 7th try. Don’t worry too much about the married wing not being usable after you’ve tied it in and taken it off; they’re tougher than you might think. Just smooth them back together with your thumb and forefinger and they will come right back to life for you.] Be sure to hump the wing, so that it will lie just on top of the white-tipped Turkey, with the top half of the underwing showing.
5. Now, it’s time to start adding the peripheral feathers that make up this pattern. The first are the shoulders, which are made up of barred Wood Duck married to Pintail Duck (or Gadwall Duck). These feathers wouldn’t marry well for me, so I mounted just the barred Wood Duck, with a slightly wider slip. Here are the barred Wood Duck slips; taken from a right and a left feather:
6. Mount the barred Wood Duck/Pintail on either side of the married wing; just above the mid-point on the married wing:
7. Next, we add Jungle Cock nails. Here are two nails that have been prepared as Tom suggests; leaving short barbs below the tie-in point; in order to get better “anchorage” of the feather when it’s tied in. It makes the stem of the feather look “fuzzy”, which is what give it a better attachment under the thread.
8. Mount the Jungle Cock nails on either side of the married wing; just below the mid-line on the married wing, with the tips just inside of the barring on the Wood Duck slip:
9. Next, form the mallard roof; the same way that you did for the Silver Doctor pattern. Here are two mallard slips; taken from left and right mallard flank feathers:
10. Next, tie in the mallard slips on both sides of the leading edge of the married wing, so that it lies along the top of the wing when it’s completed:
11. Next, add the Blue Chatterer cheeks. These are two Blue Chatterer feathers, prepped as Tom recommends, with scissor-trimmed short barbs just below the tie-in point, to add stability to the feather once it’s tied in. [Note: this is the real thing; Cotinga Cayana, not Kingfisher- I thought that this pattern deserved Blue Chatterer.]
12. Trim them down to size and tie them in so that there’s a good amount of barred Wood Duck and Jungle Cock nail still showing.
13. Next, select a Golden Pheasant topping, form it as you need it by pinching the stem between your thumb pad and index finger nail and once formed tie it in on top of the wing assembly. Be sure to notch the base of the stem where you want to tie it onto the hook. Then, mount it on top of the wing assembly, so that it compliments that GP tail.
14. Finally, trim up the feather waste ends, form the head with tying thread and coat it 2-3 times with your favorite head cement. I use SHHAN; courtesy of Joni.
And that’s it; the Jock Scott!
As the man said……..”It’s all downhill from here!”
Pocono
Last edited by a moderator: