
I got a heck of a deal on a 14' 9 wt. Thomas and Thomas blank. It showed up at the post office last Friday. It is a dark blue and has a more traditional action to it. Just my style. Since getting past winter up here takes just a tad less time than the second coming of Christ, I figured I'd do an all out job on this build and post a detailed progress on it. I started today with the top grip. I cast more top hand dominant so I am going with a 14 1/2" top grip.
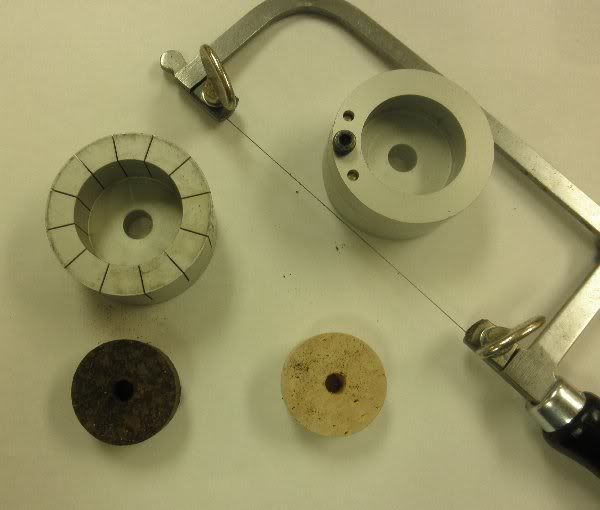
If you have never seen the jigs they have now for making checkers in the grip, you have to check them out. You can do checkers with wood the hard way. You need a table saw with a seriously good blade, and a chop saw, again with a matching killer blade. If anyone wants to know how to do them in wood send me a PM and I'll let you know what you need and how to do it. I decided to do all cork on this one, but with 'cork burl' accents and checkers for a couple of reasons. First, cork is much less maintenance intensive than wood. Second, making the checkers with cork is waaaaaay easier. Almost cheating.
Here is the jigs and the saw. The dark ring on the left is a 'burnt burl' ring. The ring next to it is really a fine example of flor grade cork. Spendy cork. The jig on the left is used to cut the rings into wedges. I almost feel silly saying it, because it is kind of self explanatory. The other one is not as obvious because of the angle of the photo. It's used to thin slice rings. You can put various washers in the bottom to make the desired thickness.
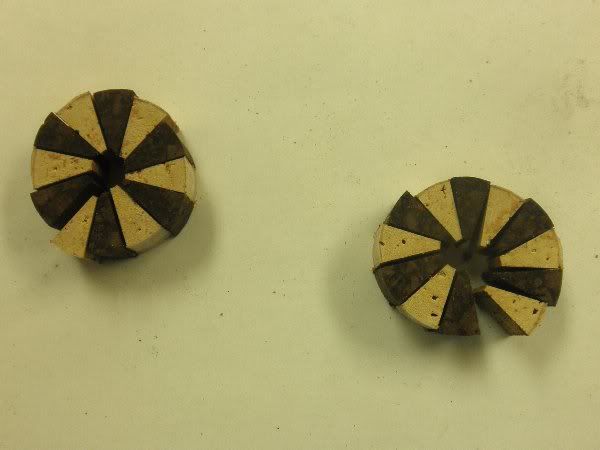
The next photo is the two rings cut up into wedges, then layed out to make the checkers. You take those wedges and glue them together and cable tie them around a 1/4" waxed steel rod. The wax keeps you from making them part of the rod.
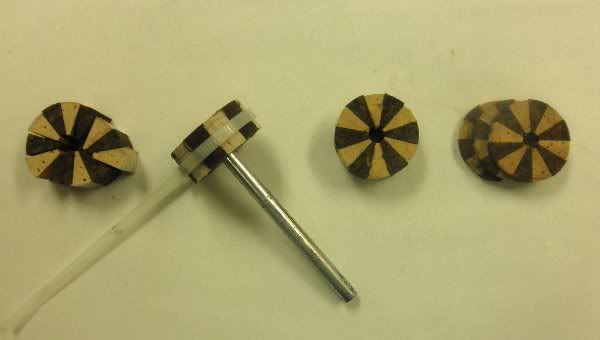
The next photo is just steps in the checker making process. As I said, with cork and these jigs it's almost cheating it's so easy. Left to right, unglued wedges, glued and clamped wedges, a dry and ready 'checker' ring, and last a thin sliced set for checkers.
The last photo is all the cork pieces layed out on a 1/4" rod.
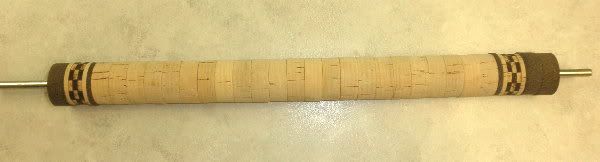
The end with just one rubberized cork ring is the end where the reel seat goes. The next thing I will do is remove them in order and redrill the center hole to 3/8" with a pilot drill and then glue and clamp it on a 3/8" mandrel so I can turn it. On a 7" cork grip you don't need to do that last part. I do it with this because the length is to long to make the hole right with a rat tail file, plus the length it's less wobbly when turning it with a beefier mandrel.
I'm thinking about doing a weave and a feather inlay on this rod. I tried like a son of a gun to get these Impeyan Monal breast feathers for the feather inlay from E-Bay, but I got sniped at the last second so I am still thinking about that one. They were a dark metallic Blue. Would have been perfect. Lots of time left to come up with a good plan B.
If you have never seen the jigs they have now for making checkers in the grip, you have to check them out. You can do checkers with wood the hard way. You need a table saw with a seriously good blade, and a chop saw, again with a matching killer blade. If anyone wants to know how to do them in wood send me a PM and I'll let you know what you need and how to do it. I decided to do all cork on this one, but with 'cork burl' accents and checkers for a couple of reasons. First, cork is much less maintenance intensive than wood. Second, making the checkers with cork is waaaaaay easier. Almost cheating.
Here is the jigs and the saw. The dark ring on the left is a 'burnt burl' ring. The ring next to it is really a fine example of flor grade cork. Spendy cork.
The jig on the left is used to cut the rings into wedges. I almost feel silly saying it, because it is kind of self explanatory. The other one is not as obvious because of the angle of the photo. It's used to thin slice rings. You can put various washers in the bottom to make the desired thickness.
The next photo is the two rings cut up into wedges, then layed out to make the checkers. You take those wedges and glue them together and cable tie them around a 1/4" waxed steel rod. The wax keeps you from making them part of the rod.
The next photo is just steps in the checker making process. As I said, with cork and these jigs it's almost cheating it's so easy. Left to right, unglued wedges, glued and clamped wedges, a dry and ready 'checker' ring, and last a thin sliced set for checkers.
The last photo is all the cork pieces layed out on a 1/4" rod.
The end with just one rubberized cork ring is the end where the reel seat goes. The next thing I will do is remove them in order and redrill the center hole to 3/8" with a pilot drill and then glue and clamp it on a 3/8" mandrel so I can turn it. On a 7" cork grip you don't need to do that last part. I do it with this because the length is to long to make the hole right with a rat tail file, plus the length it's less wobbly when turning it with a beefier mandrel.
I'm thinking about doing a weave and a feather inlay on this rod. I tried like a son of a gun to get these Impeyan Monal breast feathers for the feather inlay from E-Bay, but I got sniped at the last second so I am still thinking about that one. They were a dark metallic Blue. Would have been perfect. Lots of time left to come up with a good plan B.