Rod wrapping devices ???

random user

Well-known member
Messages
580
Reaction score
9
Location
S. E. Taxachusetts
Been looking into these because I am going to be fabricating one.

I know that a cardboard box and a fly tying bobbin will work, but I don't have the experience (and probably not the skill) to use an ' impromptu' device like that. Am sure some people can wrap rods effectively with just a spool of thread. I'm not one of those people.

Have basic wood tools and skill and a bunch of 3/4 board scrap to work with and a threaded rod, washer, wing nut spring tensioning set up is available at just about any hardware store.

Found this: [ame=http://youtu.be/zq3aK9zhyus]Rod Building 101 - Wrapping Guides - YouTube[/ame]

Is there any real advantage to that cantilever style over a rod wrapper which is fastened to or just sitting on m a tying bench?

My goal here is to build an inexpensive tool which will make wrapping easier, less frustrating and more fool-proof for a first-timer.

Thanks much.
 

badfish creek

Active member
Messages
40
Reaction score
4
Location
Charlotte, NC
Iwasn't a fan of that type when I was looking to build my own wrapper. Seemed like if you had it to far off the work surface and applied to much pressure it would rise off the table. I stuck with a traditional type rod wrapper. I did make a couple of changes though. I added a spring loaded roller guide and I made a magnetic tension devise. When set up right I can back up the thread a little and still keep it under tension!


  • Like
Reactions: Ard

Guest1

Banned
Banned
Messages
4,744
Reaction score
82
Location
Lake of the Woods/Rainy River Minnesota Canada bor
For the rod stands just get a couple of feet of 1X6. Drill two holes at the center of the length of the board about an inch apart. Make one 1 1/8" and the other 3/4" Cut the bourd through the center directly between the holes and then again through the middle of the holes. Save everything you cut off. Then cut the ends off 6" from the the cut through the holes. Use the cut off pieces without the holes to make the base and assemble them like this.


Glue a piece of felt in the dip made by your half holes on all four parts with half a hole. The short ones are perfect for some things like keeping it steady while doing the writting. That's why I said don't toss it out.

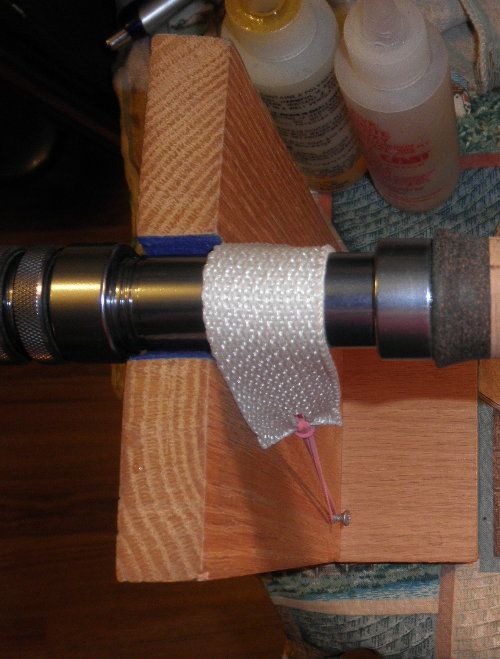
Take the stand with the big hole and put two scews near the base into it with the head hanging out a good 1/8". Make a strap that hooks over the rod with 1" web strap by burning holes in the ends with a hot nail and add rubber bands.

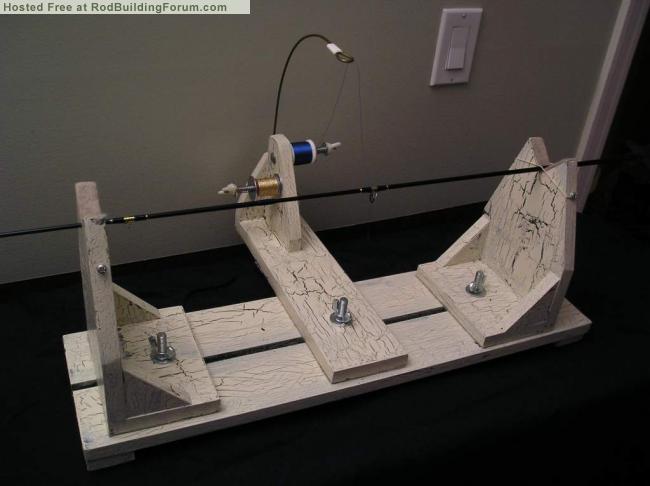
This takes care of the stand issue for you. Next make a thread tension and turning motor portion with a piece of 1X6 about 18" long. When you go to the lumber yard you will need a total of 3.5'. Cut it at 12" and 8". Put it together as an L @ 90°. Get a piece of dowel or two and drill holes for them so you have a spot for the spool/s to set.


Now at this point, you have a couple options. You can get a thread tension device like I have. I got one off of a busted sewing machine. That is an option and an excuse to go dump shopping. Don't ask. You can get them from some rod building suppliers. Another option is to replace the dowel or blank piece (which I used) with a piece of allthread. Put a felt disc at the bottom and in this order after that. Base-felt pad-thread-felt pad-washer-spring with seperated turns-washer-nut-wing nut. This will give you the tension you need and is very adjustable, but you need to adjust it everytime you change thread. You don't with the tension device. Now in my photo, you see I have a rod tip. That is to maintain tension in the event you need to back up for a crossed thead or something. That strap on the first part is for the same reason, maintaining tension. It never fails that you need a third hand for some things, the phone rings etc, and the strap allows you to walk of and not have stuff come loose and screwed up on you.

In my thread stand, the path the thread makes is from the spool, through the tension device, through an old small spinning guide I have bent the foot so it's flat and then glued in (to keep the thread going flat through the tension device), then last up through the rod tip on onto the rod you are building.

There are a lot of options for a turning motor. Old rotisery motors work good. I got mine from Cabelas. I built it right into the same stand to add weight so the thread stand does not move around while you are working. There are also a lot of options for a chuck. You can buy one, still a lot of options there. You can make one. My first one was a piece of cork on an old arrow shaft I drilled a hole and tapped for a set screw to lock in place on the turning motor shaft. I just use masking tape to hold it to the arbor for turning. In this photo you can see the set screw/arrow shaft thing I mentioned.


The second one I mad was also on a short piece of aluminum arrow shaft with the set screw deal. I made it out of an empty thread spool for heavy sewing thread. It has a tape arbor around the arrow shaft to make it fit, and then four screws to use rubber bands to hold the rod butt in place. You can see that all in the photo of the first tension stand I put in the post. How ever you decide to do the chuck on your turning motor, make shure it is the same height as rod stands so when you turn the rod, you don't have the finish drifting to one end of the rod.

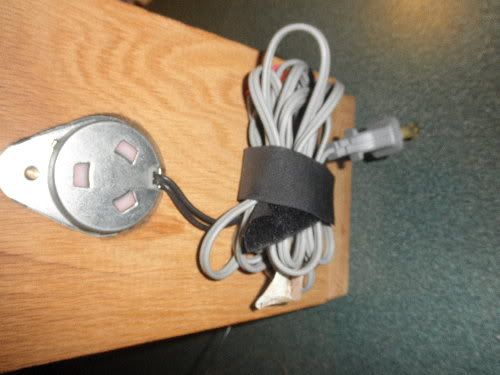
I added a velcro strap deal to keep the electrical cord out of the way.


In the one photo of the tension stand, you notice there is two rod tips. One short and at a much lower angle. That one is for doing weaves, in case you were curious as to what it was for. It puts the angle of the thread going onto the blank much lower. I can do my laft list easier if I have a top of the work clear.

This was all pretty much home made. It was not expensive and I have never really thought about upgrading as it works just fine. I even made a second set. In fact, I thought about getting a power wrapper for a bit. I was worried I would not be able to get the quality of wraps though. I went to Montana and visited the R. L. Winston factory. They told me that they bought power wrappers for everyone, and it didn't take two weeks for them to go back to doing it by hand. That was the end of my desire to upgrade.
 
Last edited:
  • Like
Reactions: Ard
L

Liphookedau

Guest
Dan you Machines are Simple some of mine are similar however they do the job as all The Rods I've seen of yours are real Quality.
Many years ago one on our Club members secured a deal on One Piece Blanks so everyone made wrapping Machines from Old Sewing Machine Motors utilising The Foot Pedal.
A couple of years ago I also made Wrapping & Drying Machines again from Sewing Machine Motors Old Battery Drills which I run from Plug Packs & like Dan from Microwave Oven Motors.
Also I saw on The Internet a Wrapping Machine from an Early Journal I used wheels from Old Skateboards.
I'm yet to give all my gear a real workout as I've really mainly used it for Rod repairs The bottom line is I still have 4 Rods to Finish hopefully This Winter I'll get the Finished.
Brian.
 

random user

Well-known member
Messages
580
Reaction score
9
Location
S. E. Taxachusetts
Thanks for all the details!

DOH! I had a Homer moment! If I come 8" off my tying bench I have enough space for a long blank on either side. If I go in 8" onto the bench, I have very limited distance on one side.

The back end lift on the cantilever is easy enough to counted.

Ever one of these I see is different arrangements of the same components.
Okay, this ain't rocket surgery. I don't need to over think this or reinvent the wheel. Copy what I have seen out of what I have on hand.

Thanks much.
 
L

Liphookedau

Guest
Oh no you didn't! No mention of the W word here till we get some warm weather.:D
Dan Sorry for using a Swearword I'd forgotten our W >xxxxS aren't nearly as severe as yours in The Northern Hemisphere.
I hope you get better weather soon after all it's supposed to be Spring over there.
Brian
 

dean_mt

Well-known member
Messages
4,739
Reaction score
83
Location
Western Montana
These are both great looking devices, guys! I need to incorporate some sort of device like the spring loaded roller / rod tip to keep tension when backing off...you always need to back up!

Badfish: does the thread just go under the roller and then up over the rod? That is nice and simple, I like it.

Dan: I've seen your set-up before but I can't figure out how the thread goes through the rod tip and then to the blank for wrapping. Maybe it is the angle of the picture. Thread comes off the spool, through the eye on the stand, up through the rod tip, and then ... how does it get back to the blank? Do you wrap from "over" the blank or "under"?

My 2cents: make a constant thread tensioner like one of these, you don't need it, but you'll want it if you don't have it! My thread spool tensioners are long carriage bolts up through the stand base with washer, spring and one of those little black alligator paper clips on the top of the bolt to make tension. I am going to change this to a horizontal bolt like the one badfish has. The thread too often gets under the spool and twists around the bolt and then you have to take the dang thing all apart to untangle the thread. Pain in the arse. I wonder if Dan's felt pads on the base help resolve that issue.
I added a sliding bar to be able to align the thread to different positions on the blank, there was no need for so many eyelets. But I did find the length on the bar to be handy when wrapping the ferrules and top couple guides and tip top as they are off the end of the stand, I could slide the bar with the eyelet out beyond the stand leg. I do have to change the position of the whole thing though as the thread comes out of the eyelets under and behind the rod, which makes it harder to see and control. I want the thread to come out under but "in front of" or on my side of the rod while I wrap.


Otherwise, just keep it simple, like these above.
 

swirlchaser

Well-known member
Messages
2,062
Reaction score
49
Location
Parlin, NJ / Staten Island, NY
These are both great looking devices, guys! I need to incorporate some sort of device like the spring loaded roller / rod tip to keep tension when backing off...you always need to back up!

Badfish: does the thread just go under the roller and then up over the rod? That is nice and simple, I like it.

Dan: I've seen your set-up before but I can't figure out how the thread goes through the rod tip and then to the blank for wrapping. Maybe it is the angle of the picture. Thread comes off the spool, through the eye on the stand, up through the rod tip, and then ... how does it get back to the blank? Do you wrap from "over" the blank or "under"?

My 2cents: make a constant thread tensioner like one of these, you don't need it, but you'll want it if you don't have it! My thread spool tensioners are long carriage bolts up through the stand base with washer, spring and one of those little black alligator paper clips on the top of the bolt to make tension. I am going to change this to a horizontal bolt like the one badfish has. The thread too often gets under the spool and twists around the bolt and then you have to take the dang thing all apart to untangle the thread. Pain in the arse. I wonder if Dan's felt pads on the base help resolve that issue.
I added a sliding bar to be able to align the thread to different positions on the blank, there was no need for so many eyelets. But I did find the length on the bar to be handy when wrapping the ferrules and top couple guides and tip top as they are off the end of the stand, I could slide the bar with the eyelet out beyond the stand leg. I do have to change the position of the whole thing though as the thread comes out of the eyelets under and behind the rod, which makes it harder to see and control. I want the thread to come out under but "in front of" or on my side of the rod while I wrap.


Otherwise, just keep it simple, like these above.
This is fine if your building 3 or 4pc flyrods. If your working with longer sections of blank you will need to make atleast one more v-block to support a longer blank. The bed of my rod wrapper has 4 4' sections to accommodate up to 12", one piece surf rods comfortably. :eek:
 

random user

Well-known member
Messages
580
Reaction score
9
Location
S. E. Taxachusetts
Thanks for the images and advice. Dug through the scrap lumber I have and made a trip to the big orange box last night. Will start cutting after a cup or two this morning.

Found this on google. Seems to be a good design. Just not industrious enough to build it. I'm going with uber simple.


Rod Building > Rod Wrapper
 

dean_mt

Well-known member
Messages
4,739
Reaction score
83
Location
Western Montana
If it works for you then it's perfect! So you did the rod tip constant tensioner ala Dan? What is the dowel to the right do? It there a paint brush tip dangling off it?

---------- Post added at 10:38 AM ---------- Previous post was at 10:21 AM ----------

This is fine if your building 3 or 4pc flyrods. If your working with longer sections of blank you will need to make atleast one more v-block to support a longer blank. The bed of my rod wrapper has 4 4' sections to accommodate up to 12", one piece surf rods comfortably.
I did make one single block support that I put outside the stand to support a long end. That XP I just built is a 9'6" two piece, so I had my challenges just with the 57" sections in my stupid little basement room!

Anyway, a question for you guys: I see that some folks have their thread coming from the above the rod, others like it run from underneath then up and around the rod. I know it's personal preference, but are there practical advantages/disadvantages to one way or the other?
 

Guest1

Banned
Banned
Messages
4,744
Reaction score
82
Location
Lake of the Woods/Rainy River Minnesota Canada bor
Holy cow! You are a lot more neat and organized than I am. Like it was said before, if it works, it's perfect. :thumbup: It doesn't need to be really pretty. If you made it out of Amboyna Burl slabs with beautifully routered edges and a finish like furniture, it wouldn't make any better rods. Have fun with it, can't wait to see what you produce on it.
 

Guest1

Banned
Banned
Messages
4,744
Reaction score
82
Location
Lake of the Woods/Rainy River Minnesota Canada bor
Anyway, a question for you guys: I see that some folks have their thread coming from the above the rod, others like it run from underneath then up and around the rod. I know it's personal preference, but are there practical advantages/disadvantages to one way or the other?
I like it on top because that's where my eyeballs are eyeballing it from. :D
 

dean_mt

Well-known member
Messages
4,739
Reaction score
83
Location
Western Montana
I like it on top because that's where my eyeballs are eyeballing it from. :D
Makes sense Dan! Do you turn the rod by hand or motor? The direction of rotation would be different if the thread comes from the top and under the blank as opposed to from under and over the blank (clockwise). I've always done it from underneath and over, maybe I should try the opposite to see how it feels.

I have a feeling that spring fishing might be over here for a while. It was cold and snowing a week ago, we had 3 nice warm days and the rivers began to rise. Now it's raining and the temps are supposed to climb to 80 by Saturday with overnight lows above freezing. That is the perfect recipe for run-off! So I might just have to start a new project and a new wrapper would be fun...then I'll need to try it out...
 

random user

Well-known member
Messages
580
Reaction score
9
Location
S. E. Taxachusetts
What is the dowel to the right do? It there a paint brush tip dangling off it?
It's a 1/4" oak dowel with an expansion spring and an eyelet. Wrapped the dowel with 3/0 and head cement to keep the dowel form splitting where the eyelet screws in. Tried it out as a substitute for the rod-tip-a-la Dan. Didn't work so well, so I spent some time tracking down an old rod tip to do it right.

Thing I am happy about is it gave me a good, clean, tight wrap the first time! I call that a win.
 

Guest1

Banned
Banned
Messages
4,744
Reaction score
82
Location
Lake of the Woods/Rainy River Minnesota Canada bor
Makes sense Dan! Do you turn the rod by hand or motor? ...
I stick to doing it by hand. No crossed threads, nice tight 'n purty. :D I am not sure what thread I mentioned this story, so if it's a repeat forgive me. :rolleyes:

I went to the R.L. Winston factory a while back and talked with them. They had a few years back bought all their thread people power wrappers. It took less than two weeks and they had gone back to doing it by hand. That was the end of my desire to get a power wrapper. I had thought it would be hard to get the same quality. Winston confirmed ot for me.
 

random user

Well-known member
Messages
580
Reaction score
9
Location
S. E. Taxachusetts
Holy cow! You are a lot more neat and organized than I am. Like it was said before, if it works, it's perfect. :thumbup: It doesn't need to be really pretty. If you made it out of Amboyna Burl slabs with beautifully routered edges and a finish like furniture, it wouldn't make any better rods. Have fun with it, can't wait to see what you produce on it.
HA! NEAT! HA!HA! I needed to make space. That and if I don't put things where I can see/find them, they get lost in the mess. I agree. It's a device to make a useful tool. The kid who almost failed wood shop could probably made a prettier one, but I have no interest in building rod wrappers - just an effecient means to an end.

(I haven't revamped this low end, 8'6" IM6 yet and I am already looking at blanks.)
 
Top