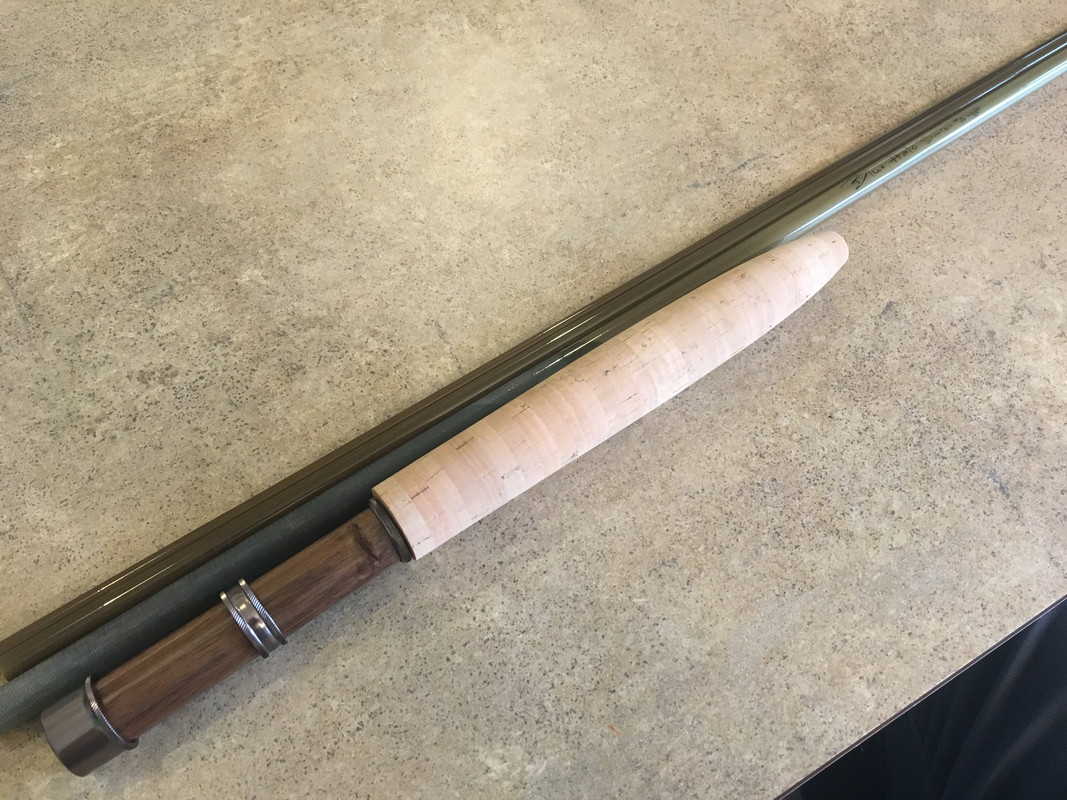
Teledan’s first fly rod build (Blue Halo 3wt)

teledan

Well-known member
Messages
524
Reaction score
325
Location
American Fork, UT
Hey guys, I have been toying with the idea of building a rod for a long time and ended up buying a Blue Halo blank last November when they went on sale. I bought a 7’6” 3wt in their Cappuccino color. It has been sitting in my shelf since then and I just recently picked up a cigar grip, a reel seat, and some guides so it’s on now!! I figured I would start a thread to track the build, I imagine I will be asking some questions along the way. Luckily I have a neighbor who has built a few rods so he has some tools/experience he has offered. Anyway, here is a pic of the blank next to the grip and seat, I am pretty pumped!


The guides I got are black. I am not really into super flashy colors so I am thinking of using either dark brown thread or trying to match the blank color. I am also trying to decide if I should use silk thread or nylon. I am leaning towards silk but am a bit nervous since this is my first build. Is silk harder to work with?
 

bish0p

Ninja
Messages
95
Reaction score
46
Location
Bay Area, NorCal
I haven't used silk thread. Silk is thinner and has less stretch than nylon. It will fray if you burnish too much. If you choose silk, look into getting a color preserver to get the nice tones.

Good luck on your build.
 

ravenbc

Well-known member
Messages
135
Reaction score
47
For your first build I would use size A nylon. Silk is a tradional wrapping thread and the only real advantage is when you want transluent or transparent wraps. Silk is thinner and will cause you more issues as well as will break more often while you wrap.

It is still possible to get a transparent wrap with nylon, so if that is the look you are going for nylon will still work, and there are a few tips I can share to get that look.

A couple of tips I would try is practice your wraps on the butt where the grip will cover, and then practice applying your finish, this way you will see what your finished wrap will look like and test different colors or with and without CA and help you learn how to apply finish. When you are done just scrap of the finish and thread and any damage will be covered by your grip.

Good luck and have fun.

Sent from my SM-G965W using Tapatalk
 

Angler Management

Well-known member
Messages
65
Reaction score
2
Location
Stuart FL
Good luck. When you practice actually practice on the exact rod and location you’ll be doing the wraps and all that. You’ll be surprised! You don’t want to try to replicate if you nailed it 1st time around.
 

williamhj

Well-known member
Messages
3,363
Reaction score
79
Location
Denver CO
+1 - use nylon thread.

I love nylon thread with no color preserver. You can do wraps on the butt section where the reel seat and grip will go, and even apply the finish to see how you like various spools with and without color preserver.
 

Ard

Forum Member
Staff member
Messages
26,183
Reaction score
16,352
Location
Wasilla / Skwentna, Alaska
I'll go against the grain and say I love silk dressings due to the translucent reaction of silk to Varnish. Yep, I said varnish :)
 

ravenbc

Well-known member
Messages
135
Reaction score
47
I'll go against the grain and say I love silk dressings due to the translucent reaction of silk to Varnish. Yep, I said varnish :)
Silk does look great especially it treated right to be transluent on a glass rod looks awesome. But for the first couple builds Nylon will be easier to get the hang of wrapping and burnishing.

Sent from my SM-G965W using Tapatalk
 

teledan

Well-known member
Messages
524
Reaction score
325
Location
American Fork, UT
Thanks for the info guys! I am finally getting around to actually doing something with this build :) I have a question though. I’ve got the grip teamed out nicely so that the nose is nice and tight around the blank and I am thinking I want go without a winding check and just have a very minimal look there. For those of you that have built rods without a winding check, do you do anything special to seal it up or just epoxy the grip on and call it good? Could I do a few wraps up to the cork and then finish over it? And most importantly, if you have any pictures I would love to see them :)
 
Last edited:

tcorfey

Well-known member
Messages
3,369
Reaction score
3,932
Location
SF Bay area California
I am with Ard that I prefer silk thread, even had my boys at 11 and 12 wrapping with silk so it is not difficult to use and I think it looks nicer because it lies flatter for me, but I have seen some nice looking nylon wraps too so don't let my prejudice concern you. Thread is cheap, buy a couple or three spools and do some test wraps to see what you like. You can always use the thread you did not choose to tie flies later. Just for the heck of it I googled your rod and viewed images, it seems various shades of brown are a popular choice so you are not way off base with your current thinking.

One thing to consider is that most rods do have a winding check even if it is a thin small one it just looks better I think. But again it is your rod so do what you think is best.

Regards,

Tim C.
 

teledan

Well-known member
Messages
524
Reaction score
325
Location
American Fork, UT
Thanks! I forgot to mention that I bought a couple spoils of nylon thread that I am going to try. I got some Fuji Ultra Poly in dark brown and some Pro Wrap in chocolate.

I actually do have a winding check but the outer diameter is a bit larger than the cork at the nose. I probably could sand the nose back a bit until the OD matches the OD of the winding check but I do also like the look of having nothing there.
 

Lewis Chessman

Well-known member
Messages
1,822
Reaction score
1,945
Location
Isle of Lewis, UK.
Hi, teledan. No better time to get this project moving if you're in any form of lockdown. Here in the UK we're seeing a great resurgence on the UKFFF rod building forum as we seek to save ourselves from going stir-crazy whilst still 'thinking fishy'! :)

I know it is perhaps a little late as you now have your nylon but I thought I'd post this list re: nylon/silk diameters from splinters (a master builder in my eyes) - #11 here
(Your NAFFF log in works on the UK sister-site too. If you want to join us there you'll be more than welcome, I'm sure).

Here you go James. One of the guys on the Rodmakers listserve measured various silks against nylon. Because a micrometer crushes the thread and gives different reading depending on how tight the twist is he measured by counting the number of correctly packed wraps he could fit into a half inch length. All wraps were carried out under the same tension.

Results:- Number of turns per .5"

Gudebrod 'A' nylon....67.
Janome #50 silk...........72.
YLI #50 silk.....................72.
Tire #50 silk...................75.
Belding Corticelli 'A....78.
Rice '00' silk...................84.
Naples silk......................87.
YLI #100 silk................103.
Gossamer silk.............108.

Simon.
As one can see, the diameters vary widely and some silks aren't that different from Grade 'A' nylon whilst other are much finer.

I think you have the makings of a very tasteful rod there, nicely subdued hues and a quality bit of cork, too. :)

Something I haven't tried but have seen on old Orvis 'Far and Fines' without a w/c is where the grip's nose is sanded, tapered, right down to meet the blank's O.D., then the keeper ring whipping extends up onto the cork - e.g. here.
This might be a bit adventurous for a first build but I thought I'd offer it up as an idea.

I don't wish to worry you unduly but my personal experience is that whipping is the easy bit - it's the epoxying I find tricky. Adhesive/resin ratios need to be pretty precise with some brands and pot-life can seem short when you are first learning and trying to be careful when applying. I found good ol' rod varnish the easiest, co-polymer nice to work with (thin and long life) and FlexCoat Lite tricky. It can go gloopy quickly and has a shorter work time. Adding a few drops of isopropyl alcohol does help.

I heartily recommend what others have suggested - practice on the lower butt first, including coating. In fact, for my first attempt I stripped back an old, unloved rod and re-whipped that before moving on to anything I'd paid good money for.

Don't put too much tension on the thread whilst you whip - you should still just be able to move the eye once done - and may need to in order to align them all on each section. Also, too tight a thread can create excess pressure on the blank's hoop strength and so cause a breakage when flexing in a cast.

I also recommend putting three or four coats on, each very fine. These days I apply a first coat with one brush then immediately remove any excess resin with another. Whilst this does all take time it means far less delicate sanding out of any errors between coats where one slip might scratch the blank's paintwork and the end result is handsome, flat coverage rather than 'rugby balls' ('footballs' to you guys, I guess. ;) ).

A final point, when drying a newly epoxied section ensure it is sitting level while you turn it. This will prevent any excess resin travelling to the lower end, exposing the upper threads and leaving a big dollop at the bottom.

Above all, enjoy. I believe that if you can tie a fly you can build a rod. It's actually easier and usually lasts longer, too! :)
 

el jefe

Well-known member
Messages
5,207
Reaction score
5,900
Location
Albuquerque, NM
Hey, Dan.

Check out some pictures of Scott G2 or G Series rods by Googling them. Scott does not use a winding check on those models, but they do put some thread down there. Realize that as you put finish on any threads like that, unless you are very careful, you will get finish on the cork; it may soak into the cork even from the threads. I am speculating here, but I think that Scott puts the finish cork on the front of the grip for that very reason. I have built a rod with the finish cork like that, and all I did was coat the front-most cork ring with the same rod finish that I use on the threads. It's a fun trick and gives the rod a neat look.

If you choose to sand the OD of your winding check, you will likely leave marks. There are other winding checks with varying ODs, so another one might work better.
 

sasquatch7

Well-known member
Messages
1,139
Reaction score
849
Location
Mexazonia
Hey guys, I have been toying with the idea of building a rod for a long time and ended up buying a Blue Halo blank last November when they went on sale. I bought a 7’6” 3wt in their Cappuccino color. It has been sitting in my shelf since then and I just recently picked up a cigar grip, a reel seat, and some guides so it’s on now!! I figured I would start a thread to track the build, I imagine I will be asking some questions along the way. Luckily I have a neighbor who has built a few rods so he has some tools/experience he has offered. Anyway, here is a pic of the blank next to the grip and seat, I am pretty pumped!


The guides I got are black. I am not really into super flashy colors so I am thinking of using either dark brown thread or trying to match the blank color. I am also trying to decide if I should use silk thread or nylon. I am leaning towards silk but am a bit nervous since this is my first build. Is silk harder to work with?
I have the Blue Halo 476-3pc in Sundrop , very nice blank and fishes great .

FWIW , I didnt read all the comments but here is my suggestion .

For your first build I would go with a Pro Wrap color fast nylon , it's easy to work with and looks great . Look at Pro Wrap 749 a very nice color IMHO . I dont like silk on a non Bamboo rod . Also you can practice wrapping on the first 6-10 inches of the butt section and apply the thread epoxy , just remove it with heat , think hair dryer and pop cycle stick or equivalent . I use Thread Master Lite for this as for me it's very easy to work with . HTH .
 

teledan

Well-known member
Messages
524
Reaction score
325
Location
American Fork, UT
Re: Teledan’s first fly rod build (Blue Halo 3wt)

Thanks Lewis! Great info! Yeah I am working from home now so I figure this would be as good a time as any to get this thing built up!

I think the Orvis Superfine Glass is similar to that Far and Fine you linked:

Orvis-Superfine-Glass-764-3-Combo.jpg

I thought about doing something like this but I am thinking I'll either sand the nose of the cork back so the OD matches the OD of the winding check or try and go without anything at the nose of the cork. I am kinda digging this look

BlueHalo.jpg

I'm just not sure how durable that will be. This guy typically doesn't use a winding check or anything where the cork meets the blank, but I also get the feeling these rods don't see heavy use.

Fine Tackle

And I agree, the part that makes me most nervous is finishing the wraps! I tie flies so I'm not too worried about actually wrapping the thread. I will be using Threadmaster Lite, do you have any experience with it? I really appreciate the advice!
 

teledan

Well-known member
Messages
524
Reaction score
325
Location
American Fork, UT
If you choose to sand the OD of your winding check, you will likely leave marks. There are other winding checks with varying ODs, so another one might work better.
Thanks! One other option I have considered is just turning my own winding check since I have a metal lathe. The hardware on this rod is TiCH plated aluminum though, so I would have to find a material that would match. I have a bit of 303 stainless that might work but I figured just sanding the front of the cork back just a bit to match the OD of the TiCH winding check I already have might be easier/quicker.
 

Lewis Chessman

Well-known member
Messages
1,822
Reaction score
1,945
Location
Isle of Lewis, UK.
Hi, again, teledan. I'm not sure if the Orvis Superfine is quite the same? It looks like the whipping may have been built up into a cone whilst I think on the F&F the thread actually runs up to cover the cork. I don't have a specimen of either so don't take my word for it, though!

If you have a pair of calipers (cheap digital one are just a few dollars and an invaluable tool) you can accurately gauge how far back you'll have to sand the grip to get the OD to match the w/c. Mark that point with a strip of tape.
You might now try a wee grip test, i.e. put enough masking tape on the butt section to hold the reel seat in place, slide the cork down, put on your reel on and put the sections together (I now always tape the female ferules before any 'wiggle test' to add a bit of hoop strength and prevent inadvertently splitting/cracking the blank - once bitten!).
It's not perfect as ideally you'd run the head of the line up and out of the tip ring as if fishing (if you tape on a few guides and the tip ring you can still do this) but it will give a reasonable idea of a final point of balance and whether you can afford to lose the top of the grip to, essentially, aesthetics.

I can't help you re: Threadmaster but sasquatch7 recommends it above. Google ''Threadmaster rodbuilding forum'' or similar for others' views if in doubt.
If you just want to know what colour a non-colourfast thread will turn under epoxy without actually applying it just wet a whipping and it will darken appropriately. Final colour will depend on the underlying blank colour, of course.

I'd say by all means, forego the w/c if you want to. Providing the thread will cover any gap between the blank and the top of the grip you'll be fine. The only issue I've seen is when folk stick the fly in the cork between use and it nibbles away, but that happens with a check, too.

However, El jeffe is spot on about epoxy seeping into the cork. It's hard to avoid, hard to remove and ugly if left.
An off the cuff solution might be to make a 'washer' out of masking tape to protect the nose from the resin, removing it after about 15 minutes. If you're careful when applying that might be sufficient drying time to allow its removal before it sticks permanently or disturbs the dressing on the wrap on removal - but I'm guessing here.
Given any bevel on the nose, and the need to repeat for each coating, a 'split washer' may work best. It will lie tighter, better, over any curve and be easier to lift off too. Again .... guessing. :)

What else? Use heat glue on the tip ring, it makes any final alignment easy - a quick flash with a lighter and you can re-position it numerous times.

Check every guide for burrs and file down the toes if necessary to avoid any big step up. This can be problematic with TiCH or black eyes as the shiny metal beneath gets exposed and can show through the whippings. I've got around this with a dab from a black permanent marker but there is then the risk of the ink leaking into the threads when you add the epoxy. Life's never easy, is it?

Finally, try and make each whipping on each guide leg exactly the same for each guide size, diminishing that length as you move up the rod. Again, the digital calipers are very useful here. The symmetry will really pay off visually when it's done.

No, it is all fun, honest! :)
 

el jefe

Well-known member
Messages
5,207
Reaction score
5,900
Location
Albuquerque, NM
Thanks! One other option I have considered is just turning my own winding check since I have a metal lathe. The hardware on this rod is TiCH plated aluminum though, so I would have to find a material that would match. I have a bit of 303 stainless that might work but I figured just sanding the front of the cork back just a bit to match the OD of the TiCH winding check I already have might be easier/quicker.
If you can turn your own metal winding check, you are a stud who needs no advice from anyone on this forum.:D

In all seriousness, the ability to do that raises all kinds of interesting possibilities for rod building. That is next level stuff. Now you would be talking about customizing your own reel seat hardware.

Though I am not an expert by any stretch of the imagination, two lasting lessons have been learned over my own dozen-plus builds. First, the rod finish is the trickiest part. Second, when you build your own rod, you will know where all the mistakes are, and will quite likely doubt your prowess; however, and most important, your build will likely be better than any factory build, no matter how short of your expectations you think you may fall. Take a good look at some factory builds, and you should be very pleased with your own work.

Most importantly, have fun!!
 

teledan

Well-known member
Messages
524
Reaction score
325
Location
American Fork, UT
Hehe, thanks man! I have thought about machining my own hardware, I might do that in the future but for my first build I figured I’d stick to off-the-shelf components.

I ended up sanding back the nose of the grip a bit and the winding check fits up nicely now.

IMG_0621 2.jpg

I think that should do nicely.
 

teledan

Well-known member
Messages
524
Reaction score
325
Location
American Fork, UT
Ok guys, I’ve got all my guides wrapped (I decided on the Fuji Ultra Poly thread in dark brown). I’ll try and post some pics in a bit. I have a question though. I have seen a lot of videos on fly rod building and for the tip top, everyone just epoxies or flies them on and leaves it at that. However, all of my rods appear to have wraps just below the base of the tip top with thread finish over it. What do you guys do here? Do you wrap on the blank right up to the tip top? Or do you wrap up on top of the tip top a bit?
 
Top