
WoollyBourbon
Active member
Hi all -
I've been working my way through the Orvis "premium" fly tying kit. I know that many of you aren't fans of kits, but I chose this one for three reasons:
1) I wanted some sort of "regimen" to follow that would hopefully help build basic skills
2) I didn't want to spend a ton of money to figure out whether or not this would be something I would enjoy longer term
3) I'm notoriously bad at taking good advice!
Anyway, I've been tying some of the basic patterns but can't seem to consistently "finish" a fly. I'll get to the end and it will look fine, and then everything seems to come undone while finishing. I try to be consistent, but I'm having inconsistent results.
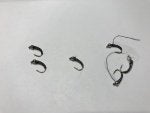
The two flies on the left below seem to have come out fine. But the ones to the right are an unraveled mess. It's happening on the vise, during or directly before the three finishing "half hitches." It's like the thread will begin to unravel off of the hook shank. Or other times the thread will break when I'm doing the half hitches. Any advice? Thought maybe it was the thread being twisted, but I've spun the bobbin at various points to avoid that....
I've been working my way through the Orvis "premium" fly tying kit. I know that many of you aren't fans of kits, but I chose this one for three reasons:
1) I wanted some sort of "regimen" to follow that would hopefully help build basic skills
2) I didn't want to spend a ton of money to figure out whether or not this would be something I would enjoy longer term
3) I'm notoriously bad at taking good advice!
Anyway, I've been tying some of the basic patterns but can't seem to consistently "finish" a fly. I'll get to the end and it will look fine, and then everything seems to come undone while finishing. I try to be consistent, but I'm having inconsistent results.
The two flies on the left below seem to have come out fine. But the ones to the right are an unraveled mess. It's happening on the vise, during or directly before the three finishing "half hitches." It's like the thread will begin to unravel off of the hook shank. Or other times the thread will break when I'm doing the half hitches. Any advice? Thought maybe it was the thread being twisted, but I've spun the bobbin at various points to avoid that....


