
Kerry Pitt
Well-known member
I did a search to make sure I was not double posting, though I did post a couple of these steps to show how you add weight to a Draper hook.
Since they are no longer manufactured it is not easy to find them, though I do have a source and am willing to share it with anyone who is looking for some. I am posting this mainly because I have sent some out to a couple of people and it may prove useful.
The Draper hook was made by Partridge up until I think Mustad bought them, then it was discontinued, yet for giving a stone nymph that flat wide look it was perfect.
I used to wrap lead around it, but in my efforts to minimize my use of that material I adapted tungsten impregnated rubber sheeting to the pattern.
So again I hope I have not double posted this, but then I can always claim I am sinking into my dotage I suppose.")
So this is the hook, you will see the thread started on it. I usually gave it a light
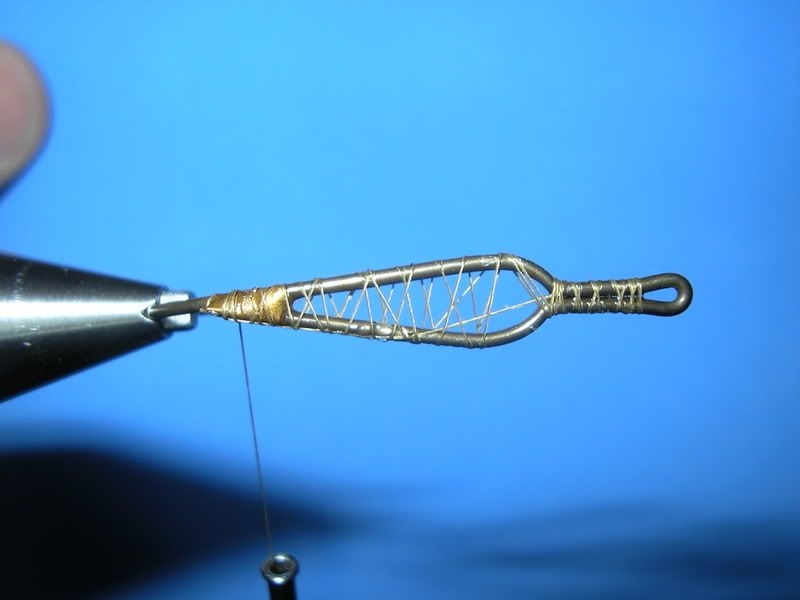 swipe of head cement or clear nail polish to keep the thread from slipping.
Then I would give the web of thread a wipe with the clear polish brush and start to wrap on a thin strip of the sheet material. This stuff is soft, so don't pull too hard on the thread.

When done you can trim off excess material and either add another layer or give the whole thing another shot of clear nail polish to fix it in place.

Dub a small bit of your golden stone dubbing to cover the tip of the frame then tie in two biots to form the "tail."

Now tie in your amber swannundaze, v-rib or larva lace as shown

So now you have this:

Now start to dub your underbody.

Finish up here.

Now wrap your rib material forward. Allow the dubbing to stick out between wraps.
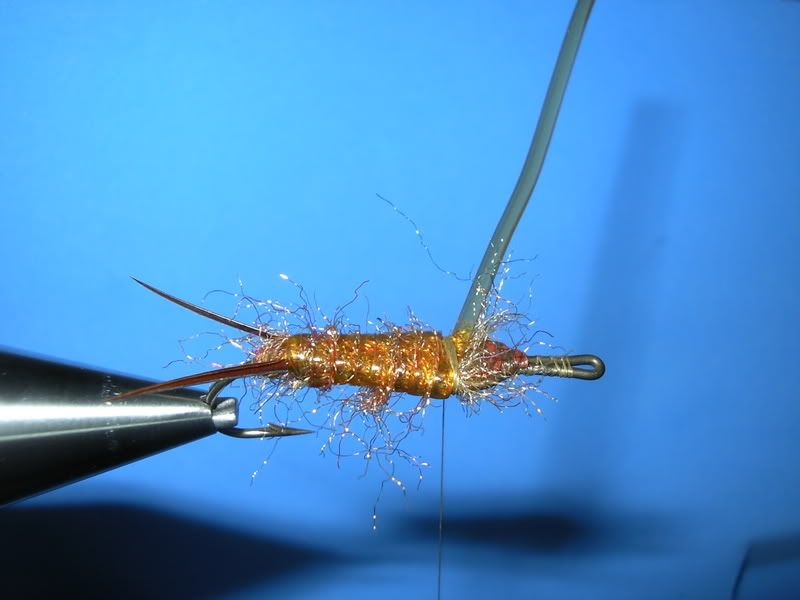
So it looks like this
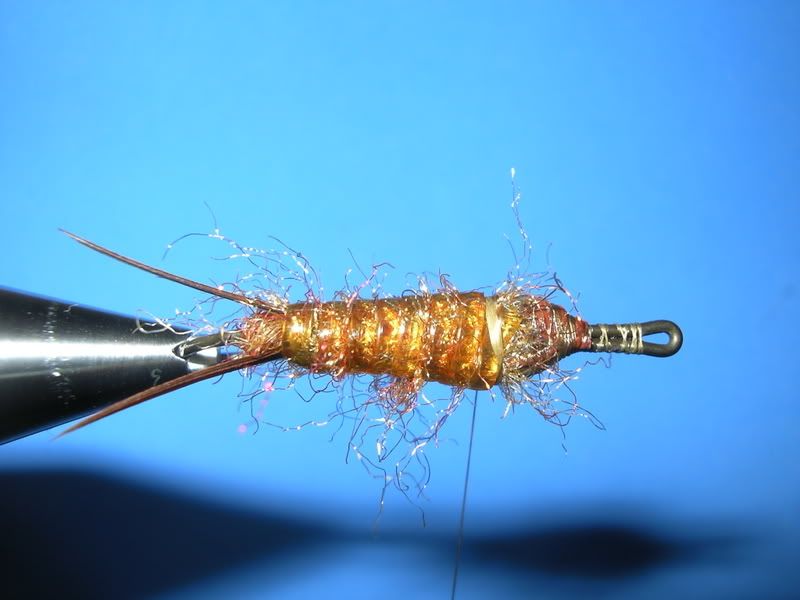
Now dub up past the shoulders of the frame.

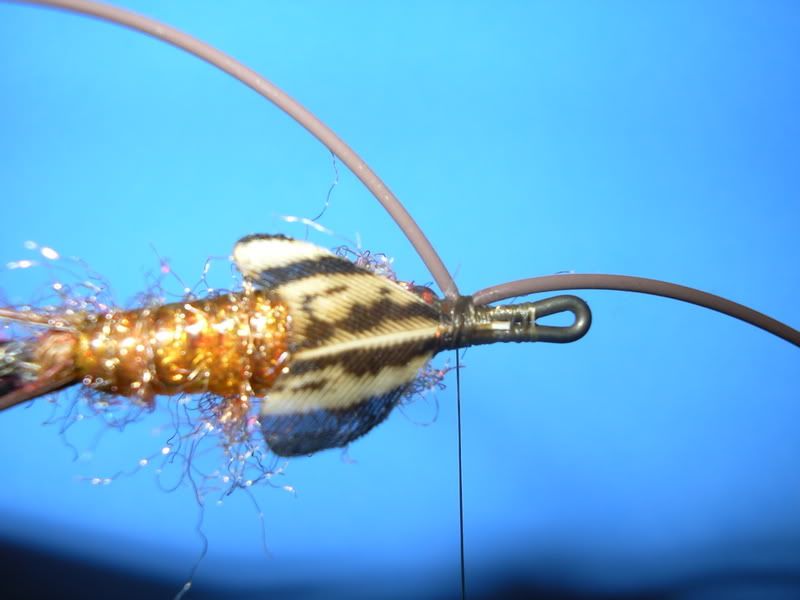
The take your pre-burnt church window feather (ringneck pheasant).

Two steps here. Tie in the wingcase, then a set of rubber legs on each side, sorry I am keeping my post a bit short. The back legs are fine where they are, but because I only use two ;eggs on each side I want to dub a bit more between the fro and back pointing legs.
Tie in another wingcase and use the wraps to help hold the front pointing legs in their position. Now tie in your biots/antennae and then dub a bit over the whole thing to cover your wraps.

From the underside it should look like this.

I use a brush to rough up the dubbing.

Should look like this from the top.

If you want more rubber legs, you can tie in the first set, then dub over your thread and leave them where they are, then tie in your second set just before tying iin your second wingcase. It is just a matter of spacing.
I wrap a bit of a collar just back of the head to hide my whip finish, rather than finishing right behind the antennae.
Since they are no longer manufactured it is not easy to find them, though I do have a source and am willing to share it with anyone who is looking for some. I am posting this mainly because I have sent some out to a couple of people and it may prove useful.
The Draper hook was made by Partridge up until I think Mustad bought them, then it was discontinued, yet for giving a stone nymph that flat wide look it was perfect.
I used to wrap lead around it, but in my efforts to minimize my use of that material I adapted tungsten impregnated rubber sheeting to the pattern.
So again I hope I have not double posted this, but then I can always claim I am sinking into my dotage I suppose.
So this is the hook, you will see the thread started on it. I usually gave it a light
Then I would give the web of thread a wipe with the clear polish brush and start to wrap on a thin strip of the sheet material. This stuff is soft, so don't pull too hard on the thread.
When done you can trim off excess material and either add another layer or give the whole thing another shot of clear nail polish to fix it in place.
Dub a small bit of your golden stone dubbing to cover the tip of the frame then tie in two biots to form the "tail."
Now tie in your amber swannundaze, v-rib or larva lace as shown
So now you have this:
Now start to dub your underbody.
Finish up here.
Now wrap your rib material forward. Allow the dubbing to stick out between wraps.
So it looks like this
Now dub up past the shoulders of the frame.
The take your pre-burnt church window feather (ringneck pheasant).
Two steps here. Tie in the wingcase, then a set of rubber legs on each side, sorry I am keeping my post a bit short. The back legs are fine where they are, but because I only use two ;eggs on each side I want to dub a bit more between the fro and back pointing legs.
Tie in another wingcase and use the wraps to help hold the front pointing legs in their position. Now tie in your biots/antennae and then dub a bit over the whole thing to cover your wraps.
From the underside it should look like this.
I use a brush to rough up the dubbing.
Should look like this from the top.
If you want more rubber legs, you can tie in the first set, then dub over your thread and leave them where they are, then tie in your second set just before tying iin your second wingcase. It is just a matter of spacing.
I wrap a bit of a collar just back of the head to hide my whip finish, rather than finishing right behind the antennae.